React Native Development Process
This article mainly explains the Taro React Native end environment installation - development - debugging - packaging - release principles and processes, React Native development before the considerations, please see Note before development
Taro3.x cross-platform(h5、weapp、rn)project development can refer to:Taro cross-platform demo(React Native + Weapp + h5)
For Taro React Native APP development debugging tool, please check Taro Playground project.
Introduction
Taro mobile development based on Facebook's open source project React Native,Taro3.x will no longer lock the React Native version, users can install >=0.60 version of React Native in their projects. In the future, React Native will be compatible with the latest version, and we will keep up with the community.
The overall design diagram is as follows:

The general process:
- register the
rnplatform in@taro/cliwithregisterPlatform. yarn dev:rngets the compiled configuration and turns it intobabel.config.jsandmetro.config.jsconfiguration;- all syntax and configurations that are not supported by
React Nativeare supported by the compiled configuration. - generating
index.ts, the entry file forReact Native, by compiling the configuration with@tarojs/taro-rn-transformer. - the entry file is introduced
@tarojs/taro-runtime-rnwrapped withcreateReactNativeApp. - page files are introduced
@tarojs/taro-runtime-rnwrapped withcreatePageConfig. - start
metro bunlder. - run
react-native run-iosorreact-native run-androidin theReact Native Shellproject to load theindex.bundle.
Version compatibility
The initialization template provided by taro init will use the latest version of React Native, it is recommended to keep both Taro version and React Native version up to date. The shell project will provide a branch for each React Native version from 0.63 onwards, with the following version compatibility.
| React Native Versions | Compatibility | Shell Project Branch |
|---|---|---|
| < 0.60.0 | Not compatible, consider using Taro version 1.x/2.x | - |
| 0.60.x | <=3.4.2 compatible, but not fully tested, please provide issue | 0.63.2, change react-native version to 0.60.0 |
| 0.61.x | <=3.4.2 compatible, but not fully tested, please provide issue | 0.63.2, change react-native version to 0.61.0 |
| 0.62.x | <=3.4.2 compatible, but not fully tested, please provide issue | 0.63.2, change react-native version to 0.62.0 |
| 0.63.x | >= 3.2.0, but after version 3.2.13, you need to add the configuration manually, refer to PR | 0.63.2 |
| 0.64.x | >= 3.2.0 | 0.64.0 |
| 0.65.x | >= 3.3.10 | - |
| 0.66.x | >= 3.3.10 | 0.66.0 |
| 0.67.x | >= 3.3.10 | 0.67.0 |
Initialization by template
Use the taro init command to initialize and select the react-native template. When finished, execute yarn upgradePeerdeps for dependency initialization. The template is easier to understand and use than the shell project pattern, which merges js projects with native projects. See the react-native template documentation for more details.
Common commands are as follows:
# Update related dependencies. Executed after initialization is complete or after a Taro version update to synchronize peerDependencies.
$ yarn upgradePeerdeps

# Package js bundles and static resources. Executed after initialization to package bundles that are used by default.
$ yarn build:rn --platform ios

# Start the bundle server
$ yarn start

# Start iOS
$ yarn ios

# Start Android
$ yarn android
Build iOS development environment
The dependencies that must be installed are: Node, Watchman and React Native command line tools and Xcode.
While you can use any editor to develop your app (write js code), you must still install Xcode to get the tools and environment you need to compile your iOS app.
Node, Watchman
We recommend using Homebrewto install Node and Watchman. execute the following command from the command line to install.
brew install node
brew install watchman
If you already have Node installed, please check that its version is above v8.3. After installing Node, it is recommended to set up an npm image to speed up the process.
Note: Don't use cnpm! The path of the module installed by cnpm is strange, and packager can't recognize it properly!
Setting up npm mirrors
npm config set registry https://registry.npm.taobao.org --global
npm config set disturl https://npm.taobao.org/dist --global
or use nrm:
$ nrm ls

* npm -----  https://registry.npmjs.org/
  cnpm ----  https://r.cnpmjs.org/
  taobao --  https://registry.npm.taobao.org/
  nj ------  https://registry.nodejitsu.com/
  skimdb -- https://skimdb.npmjs.com/registry
$ nrm use cnpm  //switch registry to cnpm

    Registry has been set to: https://r.cnpmjs.org/
Watchman is a tool provided by Facebook to monitor changes to the file system. Installing this tool can improve performance during development (packager can quickly capture file changes for real-time refresh).
Yarn
Yarn is an alternative to npm provided by Facebook to speed up the download of node modules, and a command line tool for React Native to perform tasks such as creating, initializing, updating projects, and running packager services.
npm install -g yarn
After installing yarn, you should also set up the mirror source.
yarn config set registry https://registry.npm.taobao.org --global
yarn config set disturl https://npm.taobao.org/dist --global
After installing yarn, you can replace npm with yarn, e.g. replace the npm install command with yarn, or replace npm install with yarn add for a third-party library name.
CocoaPods
CocoaPods is a package manager written in Ruby. Starting with version 0.60 the iOS version of react native requires CocoaPods to manage dependencies. You can use the following command to install cocoapods.
sudo gem install cocoapods
or use brew to install
brew install cocoapods
It also appears that the latest version cannot be installed below ruby 2.6, meaning that if you are using a macOS version lower than 10.15 (Catalina) you will not be able to install it directly. You can try installing an older version. For example, sudo gem install cocoapods -v 1.8.4, see the issue link https://github.com/CocoaPods/CocoaPods/issues/9568(https://github.com/CocoaPods/CocoaPods/issues/9568)
To learn more, you can visit CocoaPods official website。
Xcode
React Native currently requires Xcode version 9.4 or higher. You can download it from the App Store or from the Apple Developer website This step installs both the Xcode IDE, Xcode's command line tools, and the iOS emulator.
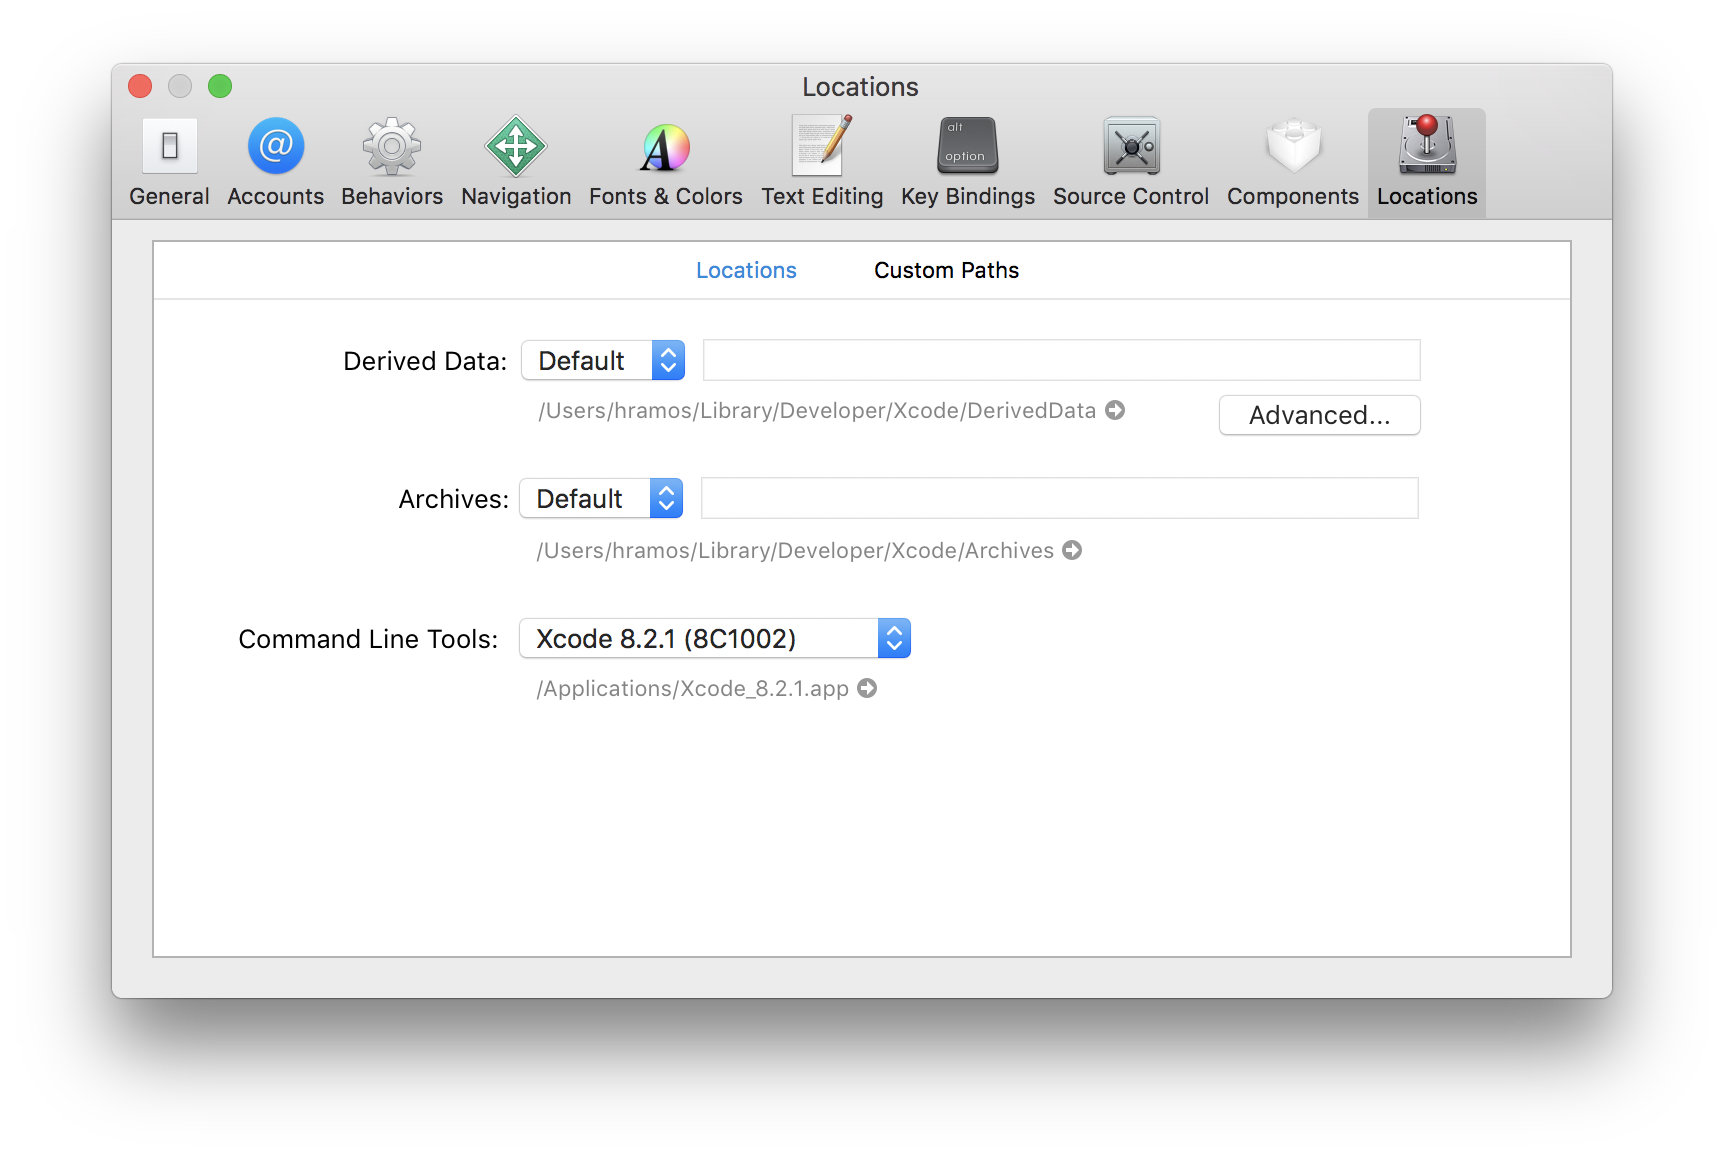
Command Line Tools for Xcode
Start Xcode and check in the Xcode | Preferences | Locations menu to see if you have a version of Command Line Tools. Xcode's command line tools include some required tools, such as git.
Build Android Development Environment
Installing dependencies
The dependencies that must be installed are: Node, Watchman and React Native command line tools as well as the JDK and Android Studio.
While you can use any editor to develop your app (write js code), you must still install Android Studio to get the tools and environment you need to compile your Android app.
Java Development Kit
React Native requires Java Development Kit [JDK] 1.8 (1.9 and higher are not supported at this time). You can do this from the command line by typing
javac -version to see what version of the JDK you currently have installed. If it is not the required version, then you can download it from the official website.
Android Development Environment
If you have not worked with the Android development environment before, be prepared for a rather tedious process. Please read the following instructions very carefully and follow the documentation closely.
Note: Please note!!! Domestic users must have a stable wall-wiping tool, otherwise they will constantly encounter link timeouts or disconnections during the download, installation and configuration, and will not be able to work on development. Some wall tools may only provide browser proxy function, or only for a specific site proxy, etc., please study the configuration or replace other software. In short, if there is a URL in the error report, then 99% is not able to properly open the wall.
If it's a socks5 proxy, the following settings don't really help
#systemProp.socks.proxyHost=127.0.0.1
#systemProp.socks.proxyPort=8016

#systemProp.https.proxyHost=127.0.0.1
#systemProp.https.proxyPort=8016

#systemProp.https.proxyHost=socks5://127.0.0.1
#systemProp.https.proxyPort=8016
The correct way to set it up should be as follows: org.gradle.jvmargs=-DsocksProxyHost=127.0.0.1 -DsocksProxyPort=8016
Modify the $HOME/.gradle/gradle.properties file to include the above line, so that the gradle agent is enabled globally
1. Install Android Studio
First download and install Android Studio, Domestic users may not be able to open the official link, please use the search engine to search for available download links. Select the "Custom" option in the installation screen and make sure the following items are checked.
- Android SDK
- Android SDK Platform
- Performance (Intel ® HAXM) (AMD processors are available here)
- Android Virtual Device
Then click "Next" to install the selected components.
If the selection box is grayed out, you can also skip it first and come back later to install these components.
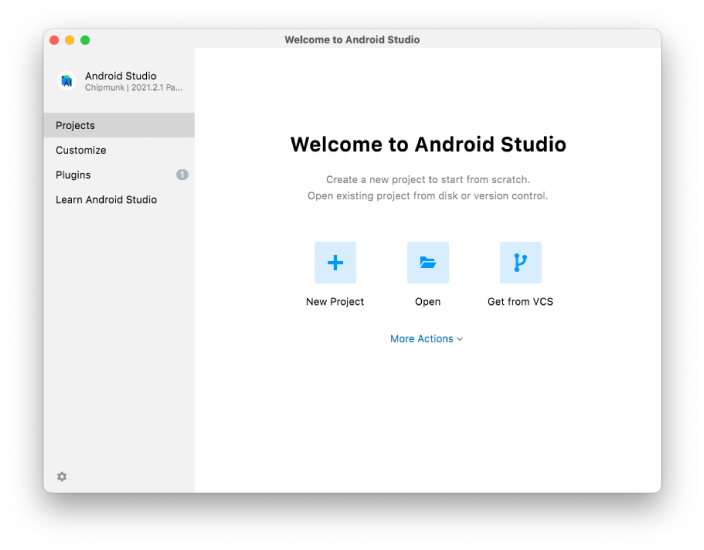
When the installation is complete and you see the welcome screen, you can do the following.
2. Install Android SDK
Android Studio installs the latest version of the Android SDK by default, currently the Android 6.0 (Marshmallow) version of the SDK is required to build React Native applications (note that the SDK version is not the same as the end system version, RN currently supports Android 4.1+ devices). You can choose to install each version of the SDK from the SDK Manager in Android Studio.
You can find the SDK Manager in the welcome screen of Android Studio. click on "Configure" and then you will see the "SDK Manager".
The SDK Manager can also be found in the "Preferences" menu of Android Studio. The specific path is
Appearance & Behavior → System Settings → Android SDK。
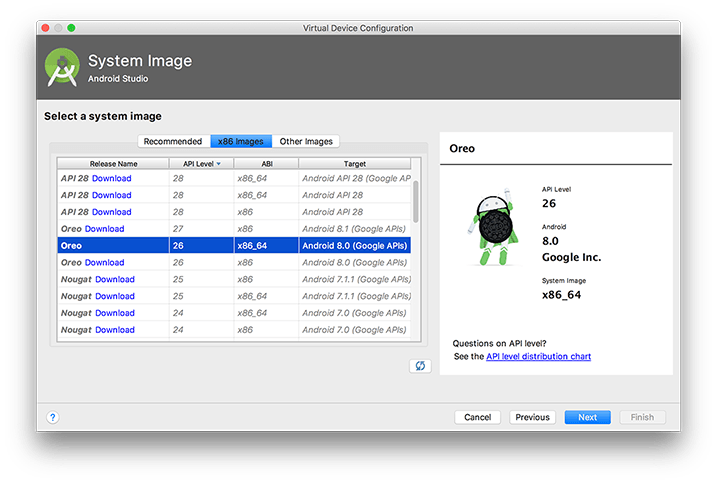
In the SDK Manager, select the SDK Platforms tab, then check the Show Package Details box in the bottom right corner. Expand the Android 6.0 (Marshmallow) option and make sure that the following components are checked (reiterate that you must use a stable wall tool, otherwise you may not even see this interface)
Android SDK Platform 28Intel x86 Atom_64 System Image(Official emulator image file, you do not need to install this component to use non-official emulator)
Then click on the "SDK Tools" tab and also check the "Show Package Details" box in the bottom right corner. Expand the "Android SDK Build-Tools" option and make sure that the 23.0.1 version required for React Native is selected. You can install multiple other versions at the same time, and then also check the Android Support Repository at the bottom.
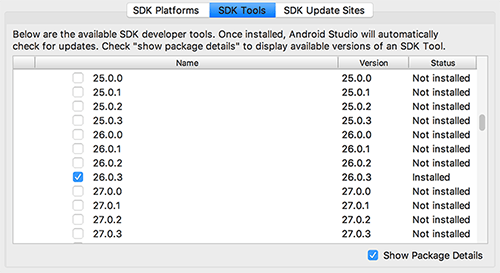
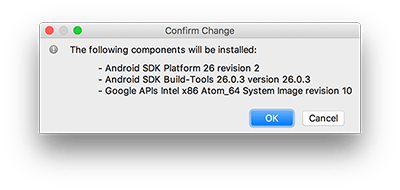
Finally, click "Apply" to download and install these components.
3. Configure the ANDROID_HOME environment variable
React Native requires environment variables to know what path your Android SDK is installed in so that it can compile properly.
This is done by adding the following command to the ~/.bash_profile file.
~ indicates the user directory, i.e. /Users/your username/, while files beginning with a decimal point are hidden in the Finder and it is possible that this file does not exist. It can be created or edited in the terminal using the vi ~/.bash_profile command. If you are not familiar with vi operation, please click this .
# If you didn't install the sdk through Android Studio, the path may be different, please make sure it's clear by yourself.
export ANDROID_HOME=$HOME/Library/Android/sdk
export PATH=$PATH:$ANDROID_HOME/tools
export PATH=$PATH:$ANDROID_HOME/platform-tools
If your command line is not bash, but something else such as zsh, please use the corresponding configuration file.
Use the source $HOME/.bash_profile command to make the environment variable setting take effect immediately (otherwise it will take effect after a reboot). You can use echo $ANDROID_HOME to check if this variable is set correctly.
Make sure you have specified the Android SDK path properly. You can see the actual path to the SDK in the Android Studio "Preferences" menu, specifically
Appearance & Behavior → System Settings → Android SDK.
Preparing an Android device
You need an Android device to run React Native Android applications. This can be either a real device or an emulator, and Android officially provides an emulator called Android Virtual Device (AVD for short). There are also many third-party emulators such as Genymotion、BlueStack,etc. Generally speaking, official emulators are free and full-featured, but the performance is poor. Third-party emulators have better performance, but may require payment or come with ads.
Using Android Device
You can also use a real Android machine instead of an emulator to develop, just connect to your computer with a usb cable and follow the Running on the device Just follow the instructions in this document.
Using Android Emulator
You can open the "AVD Manager" in Android Studi to see the available virtual devices, its icon looks like the following.

If you have just installed Android Studio, you may need to first Create a virtual device. Click on "Create Virtual Device..." and then select the desired device type and click "Next".

Select the "x86 Images" tab, where you can see the image files you have previously installed. The image file must be installed before you can create the corresponding virtual device.
If you haven't installed HAXM (Intel Virtual Hardware Acceleration Driver), first see this documentation to install

Then click "Next" and "Finish" to complete the creation of the virtual device.
Development
Compile
RN Compile Preview Mode:
# yarn
$ yarn dev:rn
# npm script
$ npm run dev:rn
# Global installation only
$ taro build --type rn --watch
# npx use can use this
$ npx taro build --type rn --watch
Taro will start compile:
$ taro build --type rn --watch
👽 Taro v3.0.15-alpha.11

Tips: The preview mode generates large files, set NODE_ENV to production to enable compression.
Example:
$ NODE_ENV=production taro build --type rn --watch


  ######                                         #     #
  #     #  ######    ##     ####   #####         ##    #    ##    #####  #  #    #  ######
  #     #  #        #  #   #    #    #           # #   #   #  #     #    #  #    #  #
  ######   #####   #    #  #         #    #####  #  #  #  #    #    #    #  #    #  #####
  #   #    #       ######  #         #           #   # #  ######    #    #  #    #  #
  #    #   #       #    #  #    #    #           #    ##  #    #    #    #   #  #   #
  #     #  ######  #    #   ####     #           #     #  #    #    #    #    ##    ######

warning: the transform cache was reset.
React-Native Dev server is running on port: 8080


To reload the app press "r"
To open developer menu press "d"
                 Welcome to React Native!
                Learn once, write anywhere
At this point, typing http://127.0.0.1:8081/index.bundle?platform=ios&dev=true into the browser will trigger a js bundle build for the corresponding endpoint platform.

After the build is complete, the browser will display the built js code.
Note: Before proceeding to the next step, please make sure that Metro Bundler Server starts properly, i.e. the browser has normal access to access the jsbundle.
Launch Application
If the previous step compiles and the Metro Bundler Server starts without problems, you can launch the application next.
Developers can integrate React Native (>=0.60) into native apps on their own. Also, to facilitate development and integration, Taro has stripped out the native part of the React Native project and put it inside a separate project NervJS/taro-native-shell, which you can think of as a React Native iOS/ Android empty app shell. You need to select the branch corresponding to the version of React Native you are using, which currently defaults to 0.64.0.
First, clone the application code down to
git clone git@github.com:NervJS/taro-native-shell.git
Then cd taro-native-shell and install the dependencies using yarn or npm install.
The project directory is as follows.
➜  taro-native-shell git:(master) ✗ tree -L 1
.
├── LICENSE
├── README.md
├── android // Android Directory
├── ios // iOS Directory
├── node_modules
├── package.json
└── yarn.lock
iOS
Launch with the React Native command
$ cd ios & pod install
$ cd ..
$ react-native run-ios
Note:pod install process cannot be skipped
The iOS simulator will start itself and access port 8081 to get the js bundle, at which point the Metro Bundler terminal will print the following.
BUNDLE [ios, dev] ./index.js ▓▓▓▓▓▓▓▓▓▓▓▓▓▓▓▓ 100.0% (1/1), done.
Launching with Xcode
Launching iOS is relatively simple, just open the ios directory with Xcode and click the Run button.

The default moduleName is "taroDemo", which should be consistent with the appName field in config/index.js.
const config = {
  ...
  rn: {
    appName: 'taroDemo',
  }
  ...
}
The configuration is in the AppDelegate.m file.
#import "AppDelegate.h"

#import <React/RCTBridge.h>
#import <React/RCTBundleURLProvider.h>
#import <React/RCTRootView.h>

#import <UMCore/UMModuleRegistry.h>
#import <UMReactNativeAdapter/UMNativeModulesProxy.h>
#import <UMReactNativeAdapter/UMModuleRegistryAdapter.h>

#ifdef FB_SONARKIT_ENABLED
#import <FlipperKit/FlipperClient.h>
#import <FlipperKitLayoutPlugin/FlipperKitLayoutPlugin.h>
#import <FlipperKitUserDefaultsPlugin/FKUserDefaultsPlugin.h>
#import <FlipperKitNetworkPlugin/FlipperKitNetworkPlugin.h>
#import <SKIOSNetworkPlugin/SKIOSNetworkAdapter.h>
#import <FlipperKitReactPlugin/FlipperKitReactPlugin.h>

static void InitializeFlipper(UIApplication *application) {
  FlipperClient *client = [FlipperClient sharedClient];
  SKDescriptorMapper *layoutDescriptorMapper = [[SKDescriptorMapper alloc] initWithDefaults];
  [client addPlugin:[[FlipperKitLayoutPlugin alloc] initWithRootNode:application withDescriptorMapper:layoutDescriptorMapper]];
  [client addPlugin:[[FKUserDefaultsPlugin alloc] initWithSuiteName:nil]];
  [client addPlugin:[FlipperKitReactPlugin new]];
  [client addPlugin:[[FlipperKitNetworkPlugin alloc] initWithNetworkAdapter:[SKIOSNetworkAdapter new]]];
  [client start];
}
#endif

@interface AppDelegate () <RCTBridgeDelegate>

@property (nonatomic, strong) UMModuleRegistryAdapter *moduleRegistryAdapter;

@end

@implementation AppDelegate

- (BOOL)application:(UIApplication *)application didFinishLaunchingWithOptions:(NSDictionary *)launchOptions
{
#ifdef FB_SONARKIT_ENABLED
  InitializeFlipper(application);
#endif

  self.moduleRegistryAdapter = [[UMModuleRegistryAdapter alloc] initWithModuleRegistryProvider:[[UMModuleRegistryProvider alloc] init]];

  RCTBridge *bridge = [[RCTBridge alloc] initWithDelegate:self launchOptions:launchOptions];
  RCTRootView *rootView = [[RCTRootView alloc] initWithBridge:bridge
                                                   moduleName:@"taroDemo"
                                            initialProperties:nil];

  rootView.backgroundColor = [[UIColor alloc] initWithRed:1.0f green:1.0f blue:1.0f alpha:1];

  self.window = [[UIWindow alloc] initWithFrame:[UIScreen mainScreen].bounds];
  UIViewController *rootViewController = [UIViewController new];
  rootViewController.view = rootView;
  self.window.rootViewController = rootViewController;
  [self.window makeKeyAndVisible];
  [super application:application didFinishLaunchingWithOptions:launchOptions];
  return YES;
}

- (NSArray<id<RCTBridgeModule>> *)extraModulesForBridge:(RCTBridge *)bridge
{
    NSArray<id<RCTBridgeModule>> *extraModules = [_moduleRegistryAdapter extraModulesForBridge:bridge];
    // If you'd like to export some custom RCTBridgeModules that are not Expo modules, add them here!
    return extraModules;
}

- (NSURL *)sourceURLForBridge:(RCTBridge *)bridge
{
#if DEBUG
  return [[RCTBundleURLProvider sharedSettings] jsBundleURLForBundleRoot:@"index" fallbackResource:nil];
#else
  return [[NSBundle mainBundle] URLForResource:@"main" withExtension:@"jsbundle"];
#endif
}

@end
For more information, see the Xcode documentation at Building Your App
Android
In the taro-native-shell/android directory, you can see the React Native project code.
Using React Native Command Start
$ react-native run-android
The Android emulator will start itself and access port 8081 to get the js bundle, at which point the Metro Bundler terminal will print the following.
BUNDLE [android, dev] ./index.js ▓▓▓▓▓▓▓▓▓▓▓▓▓▓▓▓ 100.0% (1/1), done.
Running on real devices
Follow these steps to set up your device.
Use a USB cable to connect your device to your development machine. If you are developing on Windows, you may need to install the appropriate USB driver。
Follow the steps below to enable USB debugging in Developer options. First, you must enable the Developer options.
1. Open the Settings application.
2. Select System (on Android 8.0 or later only).
3. Scroll to the bottom and select About phone.
4. Scroll to the bottom and tap Build number 7 times.
5. Return to the previous screen and near the bottom you will find Developer options.Open Developer options, then scroll down to find and enable USB debugging
Follow these steps to run the application on your device.
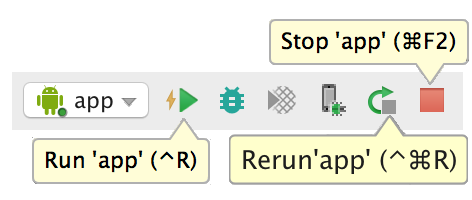
- In Android Studio, click the app module in the Project window, and then select Run > Run (or click Run in the toolbar).
- In the Select Deployment Target window, select your device and click OK.

Android Studio will install and launch the application on your connected device.
Running on the emulator
Follow these steps to run the application on the emulator.
- In Android Studio, click the app module in the Project window, and then select Run > Run (or click Run in the toolbar).
- In the Select Deployment Target window, click Create New Virtual Device.

- In the Select Hardware screen, select the phone device (e.g., Pixel), and click Next.
- In the System Image screen, select the version with the highest API level. If you do not have this version installed, a Download link will be displayed, so click on it and complete the download.
- Click Next.
- On the Android Virtual Device (AVD) screen, leave all settings unchanged, and click Finish.
- Return to the Select Deployment Target dialog box, select the device you just created, and click OK.
Android Studio will install and launch the application on the emulator.
Module Name
Similarly, the default jsBundle moduleName on the Android side is "taroDemo", located inside the MainActivity.java file.
package com.tarodemo;

import com.facebook.react.ReactActivity;

public class MainActivity extends ReactActivity {

    /**
     * Returns the name of the main component registered from JavaScript.
     * This is used to schedule rendering of the component.
     */
    @Override
    protected String getMainComponentName() {
        return "taroDemo";
    }
}
You can modify it yourself according to the actual situation.
Debugging
For more information you can view React Native Debug。
Developers Menu
React Native supports some shortcuts on the iOS emulator, which are described below. To use the shortcuts, make sure that "Connect Hardware Keyboard" is turned on in the Hardware menu of the emulator under the Keyboard option, otherwise the keys will not respond.
You can open the development menu by shaking the device or by selecting the "Shake Gesture" option in the "Hardware" menu of the iOS emulator. Alternatively, you can press the Command⌘ + D shortcut if running in the iOS emulator, or Command⌘ + M for the Android emulator (or F1 or F2 on windows), or run adb shell input keyevent 82 directly from the command line to send the menu key command.

The developer menu will not be available in the production version.
Refreshing JavaScript
In traditional native application development, each change needs to be recompiled, but in RN you can just refresh the JavaScript code and see the changes immediately. This is done by clicking the "Reload" option in the development menu. You can also press Command⌘ + R in the iOS simulator, or Press R twice in the Android simulator.
Automatic refresh
Selecting "Enable Live Reload" in the development menu turns on auto-refresh, which saves you time in development.
What's even more amazing is that you can also keep the application in its current running state and the modified JavaScript files will be injected automatically (like a moving car with new tires without stopping). To implement this feature, just turn on theHot Reloading .
In some cases hot reload does not work. If you encounter any problems with the interface refresh, please try a full manual refresh.
However, there are times when you have to recompile the application for the changes to take effect:
- New resources are added (e.g. images to iOS's Images.xcassets or Andorid's res/drawable folder)
- Changed any native code (objective-c/swift/java)
In-app error and warning alerts (red and yellow screens)
Red or yellow screen tips are only shown in the development version, not in the official offline package.
Red Screen Error
In-app error reporting is displayed in the application in full-screen red (in debug mode), which we call red box error reporting. You can use console.error() to trigger red box errors manually.
Yellow Screen Warning
In-app warnings are displayed in full-screen yellow in the application (in debug mode), which we call a yellow box error. Click on the warning to see the details or ignore it. Similar to the red screen warnings, you can use console.warn() to manually trigger the yellow box warnings. By default, yellow screen warnings are enabled in development mode. It can be turned off with the following code.
console.disableYellowBox = true;
console.warn('YellowBox is disabled.');
You can also block specified warnings by code, by calling the ignoreWarnings method with an array of parameters like this.
import {YellowBox} from 'react-native';
YellowBox.ignoreWarnings(['Warning: ...']);
In CI/Xcode, yellow screen warnings can also be controlled by setting the IS_TESTING environment variable to enable or disable them.
Both red screen errors and yellow screen warnings are automatically disabled in the release version (release/production).
Chrome Develop Tools
You can start debugging JavaScript code in Chrome by selecting the "Debug JS Remotely" option in the Developer menu. Clicking this option will automatically open the debug page http://localhost:8081/debugger-ui. (If the address bar opens with an ip address, please change it to localhost yourself)
Select Tools → Developer Tools in Chrome's menu to open Developer Tools, which can also be opened via keyboard shortcuts (Command⌘ + Option⌥ + I on Mac, Ctrl + Shift + I or F12 on Windows)。Open can Pause On Caught Exceptions
Note: Chrome does not directly see the App's UI, but only provides console output and debugging of js scripts at sources breakpoints. Some older tutorials and articles refer to the Chrome plugin for React, which does not currently support React Native and is not required for debugging itself. However, you can install a standalone (non-plugin) version of React Developer Tools to assist in viewing the interface layout, which is described below.
Note: Network requests in React Native cannot be observed using Chrome debugging at this time, you can use the more powerful third-partyreact-native-debuggerto Observe.
Chrome source-map Debug
Taro3.x implements source-map support for React-Native.

Use a custom JavaScript debugger to debug
If you want to use another JavaScript debugger instead of Chrome, you can set an environment variable named REACT_DEBUGGER with the value of the command to start a custom debugger. The debugging process still starts with the "Debug JS Remotely" option in the developer menu.
The specified debugger needs to know the directory where the project is located (you can pass multiple directory parameters at once, separated by spaces). For example, if you set REACT_DEBUGGER="node /some path/launchDebugger.js --port 2345 --type ReactNative", then the command to launch the debugger should be node /some path/launchDebugger.js -- port 2345 --type ReactNative /somepath/your RN project directory.
A debugger executed in this way should preferably be a short-lived processes and should preferably not have more than 200k of text output.
Use Chrome Developer Tools to debug on your device
If you're using Create React Native App, this is configured for you already.
For real iOS devices, you need to open the RCTWebSocketExecutor.m file and change "localhost" to your computer's IP address, and finally enable the "Debug JS Remotely" option in the developer menu.
For Android 5.0+ devices (including emulators), after connecting the device to the computer via USB, you can use the adb command line tool to set up port forwarding from the device to the computer as follows.
adb reverse tcp:8081 tcp:8081
If the Android version of the device is below 5.0, you can select "Dev Settings - Debug server host for device" in the developer menu and fill in the "IP address:port" of your computer.
If you encounter some problems while debugging Chrome, it is possible that some Chrome plug-ins are causing the problem. Try disabling all plugins and then enabling them one by one to determine if a plugin is affecting debugging.
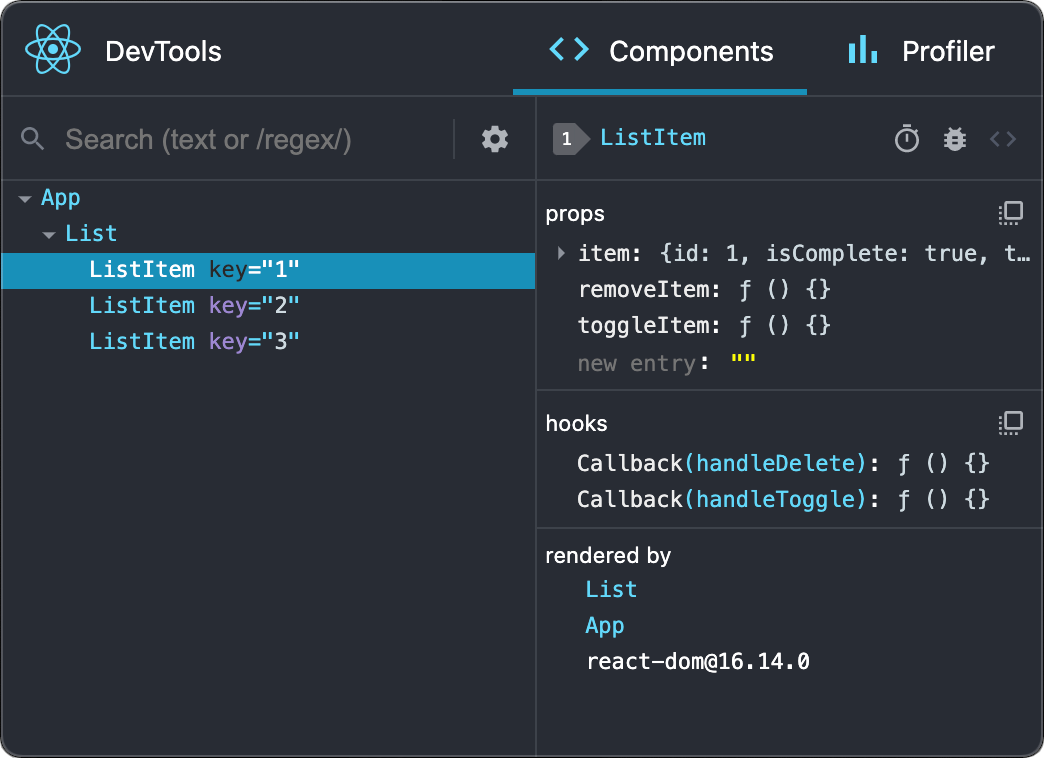
Using React Developer Tools Debug
You can use the standalone version of React Developer Tools to debug the React component hierarchy. To use it, install the react-devtools package globally:
npm install -g react-devtools
Note: react-devtools depends on electron, and electron needs to download binary packages from foreign servers, so domestic users are likely to get stuck in this step. In this case, please add the electron-specific domestic mirror source to the environment variable: ELECTRON_MIRROR="https://npm.taobao.org/mirrors/electron/", and then try to install react-devtools again.
After installation, execute react-devtools from the command line to start the tool: react-devtools.
react-devtools
It should connect to your simulator within a few seconds.
Note: if you prefer to avoid global installations, you can add react-devtools as a project dependency. Add the react-devtools package to your project using npm install --save-dev react-devtools, then add "react-devtools": "react-devtools" to the scripts section in your package.json, and then run npm run react-devtools from your project folder to open the DevTools.
Integration with React Native Inspector
Open the in-app developer menu and choose "Show Inspector". It will bring up an overlay that lets you tap on any UI element and see information about it:

However, when react-devtools is running, Inspector will enter a special collapsed mode, and instead use the DevTools as primary UI. In this mode, clicking on something in the simulator will bring up the relevant components in the DevTools:
You can choose "Hide Inspector" in the same menu to exit this mode.
Inspecting Component Instances
When debugging JavaScript in Chrome, you can inspect the props and state of the React components in the browser console.
First, follow the instructions for debugging in Chrome to open the Chrome console.
Make sure that the dropdown in the top left corner of the Chrome console says debuggerWorker.js. This step is essential.
Then select a React component in React DevTools. There is a search box at the top that helps you find one by name. As soon as you select it, it will be available as $r in the Chrome console, letting you inspect its props, state, and instance properties.
使用 React Native Debugger 调试
React Native Debugger ,一个基于 React Native 官方调试方式、包含 React Inspector / Redux DevTools 独立应用:
- 基于官方的 Remote Debugger 且提供了更为丰富的功能
- 包含
react-devtools-core的 React Inspector - 包含 Redux DevTools,且与
redux-devtools-extension保持 API 一致

安装
不同平台及版本的安装包,请点击这里。
macOS 平台可以使用 Homebrew Cask 安装:
$ brew update && brew cask install react-native-debugger
启动
在启动 React Native Debugger 之前,请先确认以下内容:
- 所有的 React Native 的 debugger 客户端已关闭,特别是
http://localhost:<port>/debugger-ui - React Native Debugger 会尝试连接 debugger 代理, React Native 默认使用
8081端口, 你可以新建一个 debugger 窗口 (macOS:Command + T,Linux/Windows:Ctrl + T) 开定义端口 - 保证 developer menu 的
Debug JS Remotely处于开启状态
你可以启动应用之后再修改端口,也可以直接通过命令行启动应用时指定端口:
$ open "rndebugger://set-debugger-loc?host=localhost&port=8081"
If the debug window is blank after starting, please make sure the debug port is correct.
Use Redux DevTools Extension API
Use the same API as redux-devtools-extension is very simple:
const store = createStore(
  reducer, /* preloadedState, */
  window.__REDUX_DEVTOOLS_EXTENSION__ && window.__REDUX_DEVTOOLS_EXTENSION__()
)
See Redux DevTools Integration section for more information.
More information
- Quick Start
- Debugger
- React DevTools
- Redux DevTools
- Shortcut references
- Network inspect of Chrome Developer Tools
- Enable open in editor in console
- Troubleshooting
- Contributing
Use of native modules
There are some platform differences that Taro cannot smooth out, such as payment, login, etc., so you need to write your own cross-end code, and you may need to modify the native code on the RN side.
For example, the login function:

React Native Documentation:native modules
Integration with Existing Apps
Taro's compiled project is actually a native React Native project, so the process of integrating into an existing native app is the same as React Native.
If you're building a new app from scratch, then React Native is a great choice. But if you just want to add a view or two or a business process to an existing native app, React Native is just as good. In a few simple steps, you can add new React Native-based features, screens, views, and more to your existing app.
React Native Documentation: Integration with Existing Apps
Build App
The next steps will help you create standalone binaries for your Expo apps for iOS and Android and submit them to the Apple App Store and Google Play Store.
An Apple Developer account is required to build iOS standalone apps, but a Google Play Developer account is not required to build Android standalone apps. If you want to submit to either app store, you will need a developer account for that store.
At packaging time, we compile the Taro code into a jsbundle file for the appropriate platform:
taro build --type rn --platform ios
taro build --type rn --platform android
Then the converted index.bundels.js code will be generated in the .dist directory (if you have not modified it).
Configure output
Specify the resource output directory by modifying the configuration . /config/index.js to specify the resource output directory, eg:
  rn: {
    output: {
      iosSourceMapUrl: '', // sourcemap file url
      iosSourcemapOutput: '../taro-native-shell/ios/main.map', // sourcemap file output path
      iosSourcemapSourcesRoot: '', // The root directory when converting sourcemap resource paths to relative paths
      androidSourceMapUrl: '',
      androidSourcemapOutput: '../taro-native-shell/android/app/src/main/assets/index.android.map',
      androidSourcemapSourcesRoot: '',
      ios: '../taro-native-shell/ios/main.jsbundle',
      iosAssetsDest: '../taro-native-shell/ios',
      android: '../taro-native-shell/android/app/src/main/assets/index.android.bundle',
      androidAssetsDest: '../taro-native-shell/android/app/src/main/res'
    },
}
Taro reads the contents of the output field and automatically overrides the default configuration.
Setting xcode related parameters
Set the xcode parameter to make the APP load the bundle file directly after build.
Add bundle files and static resource files


Set script execution conditions

Choose to package the release/debug package.(product -> scheme -> edit scheme)

Running
taro-native-shellagain will load the appropriate package according to theschemeconfiguration.
iOS
Reference Documents: Running on the device
Android
Reference Documents: Packaged APK
Publish
The official documentation of the packaged app for publishing to the App Store or major app stores can be viewed.
Common Errors
No bundle url present
There are many reasons for this error, the most common being that the computer is on a proxy. Specific reference can be made to #12754
UnableToResolveError: Unable to resolve module AccessibilityInfo
There are many reasons for this, my side is to restart the computer on the good 😂. You can check the specific #14209
Metro Bundler error: Expected path […] to be relative to one of the project roots
npm link is not supported, you can use nicojs/node-install-local replace
Image component does not resolve images with filenames that include '@' symbol

React Native does not support @ symbols in paths, see #14980。
The development server returned response error code 500
 Mostly it's a dependency problem, remove the npm dependency and reinstall it.
You can also try the following command.
Mostly it's a dependency problem, remove the npm dependency and reinstall it.
You can also try the following command.
watchman watch-del-all
rm -rf node_modules && npm install
rm -fr $TMPDIR/react-*
You can refer to the specific #1282
"Building JavaScript bundle... 100%"

There are many possible causes, see this issue:react-community/create-react-native-app#392