Installation and Usage
Installation
Taro project is based on node, please make sure you have a newer node environment (>=12.0.0), we recommend using the node version management tool nvm to manage node, so you can not only switch node versions easily, but also no need to add sudo when installing globally. and you don't need to add sudo when installing globally.
CLI Tools Installation
First, you need to install @tarojs/cli globally using npm or yarn, or just use npx:
# Use npm to install CLI
$ npm install -g @tarojs/cli

# OR Use yarn to install CLI
$ yarn global add @tarojs/cli

# OR installed cnpm, use cnpm to install CLI
$ cnpm install -g @tarojs/cli
Attention
If the installation process results in sass-related installation errors, please retry after installing mirror-config-china.
$ npm install -g mirror-config-china
View all Taro releases
You can use npm info to see the Taro version information, where you can see the current latest version
npm info @tarojs/cli
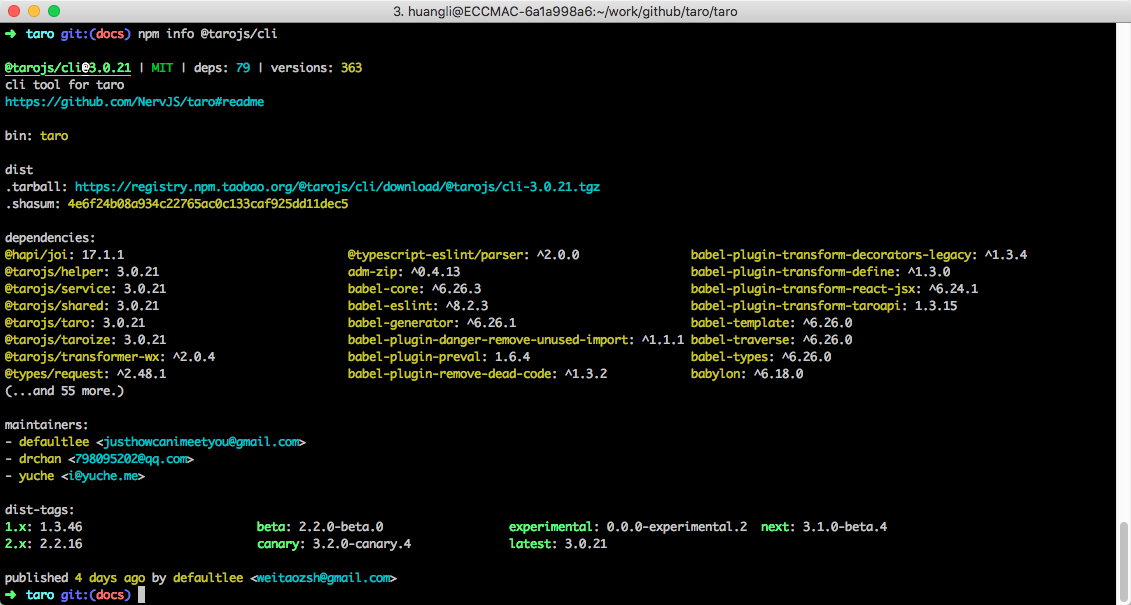
If you are using beta or canary you can see the latest version in the line below dist-tags:.
Project initialization
Create a template project using the command.
$ taro init myApp
npm 5.2+ can also be used to create template projects using npx without a global installation: npx
$ npx @tarojs/cli init myApp
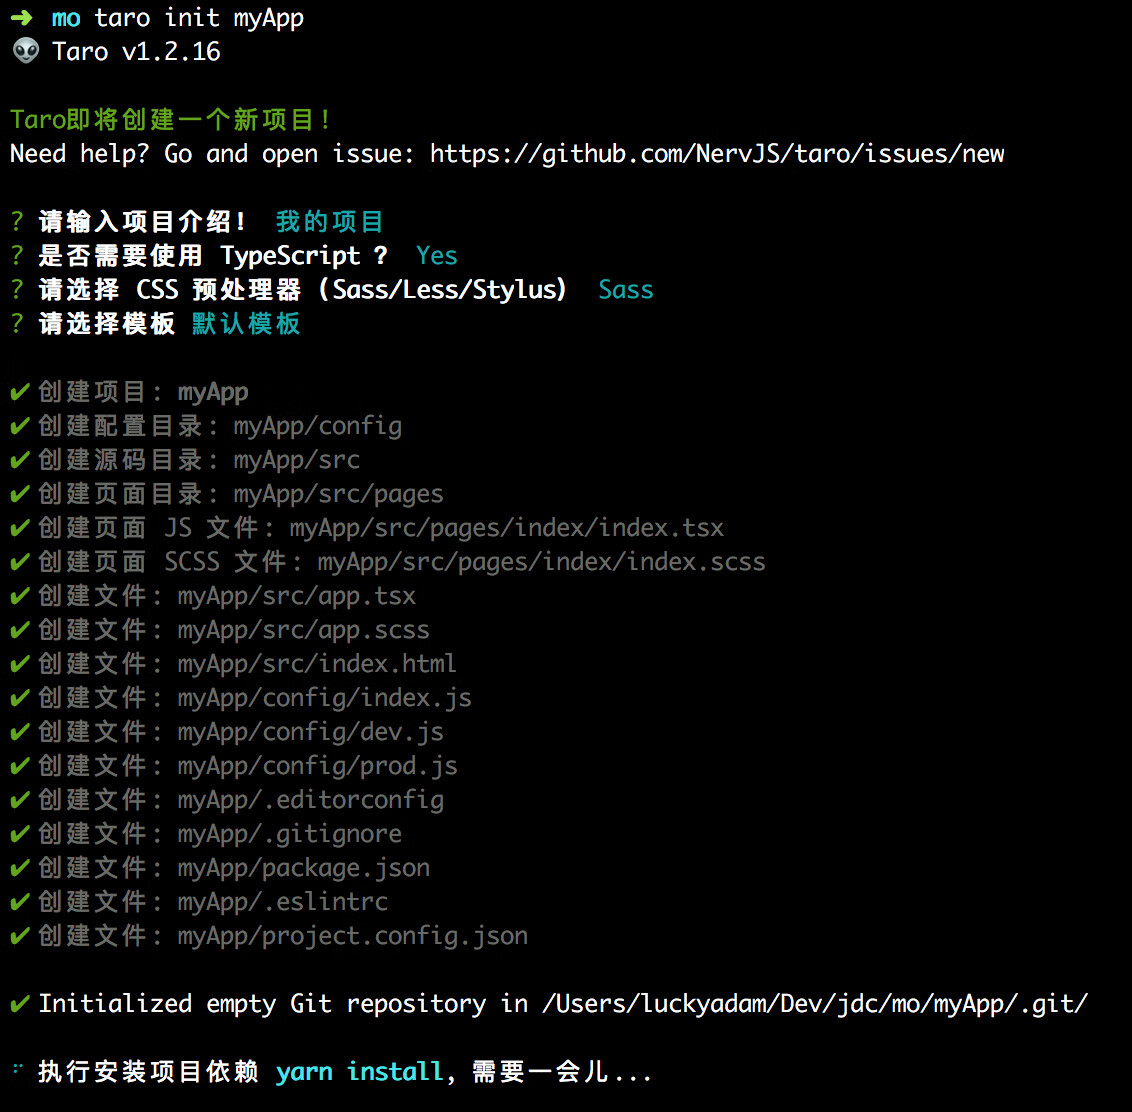
After creating the project, Taro will start installing the dependencies required by the project by default, using tools in the order of yarn > cnpm > npm. Generally, the dependency installation will succeed, but in some cases the installation may fail, in which case you can install it yourself in the project directory using the install command.
# Go to the project folder
$ cd myApp

# Use yarn to install dependencies
$ yarn

# OR Use cnpm to install dependencies
$ cnpm install

# OR Use npm to install dependencies
$ npm install
Compiling and Running
Using the Taro build command compile Taro code into different platform code, and then check the effect in the corresponding development tool.
Taro has dev and build modes:
- dev mode (add --watch parameter)) Listens for file modifications
- build mode (delete --watch parameter) Compress and package code without listening to file changes.
- dev mode generates large files, you can set the environment variable
NODE_ENVtoproductionto turn on compression for easy preview, but the compilation speed will be reduced.
Wechat Mini-Program
Compile command
# yarn
$ yarn dev:weapp
$ yarn build:weapp

# npm script
$ npm run dev:weapp
$ npm run build:weapp

# global installation only
$ taro build --type weapp --watch
$ taro build --type weapp

# npx users can also use
$ npx taro build --type weapp --watch
$ npx taro build --type weapp

# watch mode enables compression
$ set NODE_ENV=production && taro build --type weapp --watch # Windows
$ NODE_ENV=production taro build --type weapp --watch # Mac
Developer Tools
Download and open WeChat Developer Tools,, then select Project Directory for preview.
Developers need to pay attention to the project settings of the developer tools:
- Need to set off ES6 to ES5 function,turn on may lead to error
- Need to set off the style auto-completion when uploading code, turn on may lead to error
- Need to set off the code compression upload, turn on may lead to error
Baidu smart program
Compile command
# yarn
$ yarn dev:swan
$ yarn build:swan

# npm script
$ npm run dev:swan
$ npm run build:swan

# global installation only
$ taro build --type swan --watch
$ taro build --type swan

# npx users can also use
$ npx taro build --type swan --watch
$ npx taro build --type swan

# watch mode enables compression
$ set NODE_ENV=production && taro build --type swan --watch # Windows
$ NODE_ENV=production taro build --type swan --watch # Mac
Developer Tools
Download and open Baidu Developer Tools, and make sure you have set up the mini-program project configuration project.swan.json. Then select the dist directory in the project root directory to preview it.
Developers need to pay attention to the project settings of the developer tools:
- Need to set off ES6 to ES5 function,turn on may lead to error
- Need to set off the style auto-completion when uploading code, turn on may lead to error
- Need to set off the code compression upload, turn on may lead to error
Alipay Mini-Program
Compile command
# yarn
$ yarn dev:alipay
$ yarn build:alipay

# npm script
$ npm run dev:alipay
$ npm run build:alipay

# global installation only
$ taro build --type alipay --watch
$ taro build --type alipay

# npx users can also use
$ npx taro build --type alipay --watch
$ npx taro build --type alipay

# watch mode enables compression
$ set NODE_ENV=production && taro build --type alipay --watch # Windows
$ NODE_ENV=production taro build --type alipay --watch # Mac
Developer Tools
Download and open Alipay Developer Tools, Then select the dist directory in the project root directory to preview it.
Developers need to pay attention to the project settings of the developer tools:
- Need to set off ES6 to ES5 function,turn on may lead to error
- Need to set off the style auto-completion when uploading code, turn on may lead to error
- Need to set off the code compression upload, turn on may lead to error
ByteDance Mini-Program
Compile command
# yarn
$ yarn dev:tt
$ yarn build:tt

# npm script
$ npm run dev:tt
$ npm run build:tt

# global installation only
$ taro build --type tt --watch
$ taro build --type tt

# npx users can also use
$ npx taro build --type tt --watch
$ npx taro build --type tt

# watch mode enables compression
$ set NODE_ENV=production && taro build --type tt --watch # Windows
$ NODE_ENV=production taro build --type tt --watch # Mac
Developer Tools
Download and open ByteDance Developer Tools,, and make sure you have set up the mini-program project configuration project.tt.json. Then select the dist directory in the project root directory to preview it.
Developers need to pay attention to the project settings of the developer tools:
- Need to set off ES6 to ES5 function,turn on may lead to error
- Need to set off the style auto-completion when uploading code, turn on may lead to error
- Need to set off the code compression upload, turn on may lead to error
QQ Mini-Program
Compile command
# yarn
$ yarn dev:qq
$ yarn build:qq

# npm script
$ npm run dev:qq
$ npm run build:qq

# global installation only
$ taro build --type qq --watch
$ taro build --type qq

# npx users can also use
$ npx taro build --type qq --watch
$ npx taro build --type qq

# watch mode enables compression
$ set NODE_ENV=production && taro build --type qq --watch # Windows
$ NODE_ENV=production taro build --type qq --watch # Mac
Developer Tools
Download and open QQ Mini-Program Developer Tools ,and then select the dist directory in the project root directory to preview it.
Developers need to pay attention to the project settings of the developer tools:
- Need to set off ES6 to ES5 function,turn on may lead to error
- Need to set off the style auto-completion when uploading code, turn on may lead to error
- Need to set off the code compression upload, turn on may lead to error
Jingdong Mini-program
Compile command
# yarn
$ yarn dev:jd
$ yarn build:jd

# npm script
$ npm run dev:jd
$ npm run build:jd

# global installation only
$ taro build --type jd --watch
$ taro build --type jd

# npx users can also use
$ npx taro build --type jd --watch
$ npx taro build --type jd

# watch mode enables compression
$ set NODE_ENV=production && taro build --type jd --watch # Windows
$ NODE_ENV=production taro build --type jd --watch # Mac
Developer Tools
Download and open Jingdong mini-program Developer Tools(Go to https://mp.jd.com to register and you will be provided with developer tools upon successful application), and then select the dist directory in the project root directory to preview it.
Developers need to pay attention to the project settings of the developer tools:
- Need to set off ES6 to ES5 function,turn on may lead to error
- Need to set off the style auto-completion when uploading code, turn on may lead to error
- Need to set off the code compression upload, turn on may lead to error
Jingdong Mini-program related reading
- 《Rapid development of Jingdong mini program using Taro》
- 《Jingdong mini Program Taro Development vs. Native Development Review》
Enterprise WeChat Mini-program
Taro v3.1+ support started
The Taro plugin can support compiling enterprise WeChat Mini-program. Github。
Installing Plugins
yarn add @tarojs/plugin-platform-weapp-qy
Configuration Plugin
config = {
  // ...
  plugins: [
    '@tarojs/plugin-platform-weapp-qy'
  ]
}
Compile command
# yarn
$ yarn dev:qywx
$ yarn build:qywx

# npm script
$ npm run dev:qywx
$ npm run build:qywx

# global installation only
$ taro build --type qywx --watch
$ taro build --type qywx

# npx users can also use
$ npx taro build --type qywx --watch
$ npx taro build --type qywx

# watch mode enables compression
$ set NODE_ENV=production && taro build --type qywx --watch # Windows
$ NODE_ENV=production taro build --type qywx --watch # Mac
Developer Tools
Same as WeChat mini-program. The compile mode of developer tool is set to Enterprise WeChat.
DingTalk Mini Program
Taro v3.1+ support started
The Taro plugin can support compiling pinned dingtalk mini-program. Plugin documentation can be found at Github。
Installing Plugins
yarn add @tarojs/plugin-platform-alipay-dd
Configuration Plugin
config = {
  // ...
  plugins: [
    '@tarojs/plugin-platform-alipay-dd'
  ]
}
Compile Command
# yarn
$ yarn dev:dd
$ yarn build:dd

# npm script
$ npm run dev:dd
$ npm run build:dd

# global installation only
$ taro build --type dd --watch
$ taro build --type dd

# npx users can also use
$ npx taro build --type dd --watch
$ npx taro build --type dd

# watch mode enables compression
$ set NODE_ENV=production && taro build --type dd --watch # Windows
$ NODE_ENV=production taro build --type dd --watch # Mac
Developer Tools
Same as Alipay mini-program. The compile mode of developer tool is set to DingTalk.
Alipay IOT Mini-Program
Taro v3.1+ support started
The Taro plugin supports compiling Alipay IOT Mini-Program, Plugin documentation can be found at Github。
Installing Plugins
yarn add @tarojs/plugin-platform-alipay-iot
Configuration Plugin
config = {
  // ...
  plugins: [
    '@tarojs/plugin-platform-alipay-iot'
  ]
}
Compile Command
# yarn
$ yarn dev:iot
$ yarn build:iot

# npm script
$ npm run dev:iot
$ npm run build:iot

# global installation only
$ taro build --type iot --watch
$ taro build --type iot

# npx users can also use
$ npx taro build --type iot --watch
$ npx taro build --type iot

# watch mode enables compression
$ set NODE_ENV=production && taro build --type iot --watch # Windows
$ NODE_ENV=production taro build --type iot --watch # Mac
FeiShu Mini program
Taro v3.1+ support started
Using Taro plugin can support compiling FeiShu mini program, see Github for plugin documentation.
Install the plugin
yarn add @tarojs/plugin-platform-lark
Configure the plugin
config = {
  // ...
  plugins: [
    '@tarojs/plugin-platform-lark'
  ]
}
Compile command
# yarn
$ yarn dev:lark
$ yarn build:lark

# npm script
$ npm run dev:lark
$ npm run build:lark

# Global installation only
$ taro build --type lark --watch
$ taro build --type lark

# npx user can use
$ npx taro build --type lark --watch
$ npx taro build --type lark

# watch Also turn on compression
$ set NODE_ENV=production && taro build --type lark --watch # Windows
$ NODE_ENV=production taro build --type lark --watch # Mac
Developer tool
FeiShu mini program can run on Fishu client and one set of code runs on multiple ends (including PC and mobile). You need to download and open FeiShu mini program developer tool, and make sure you have set up the mini program project configuration file. Then select the dist directory in the project root directory for preview.
Need to pay attention to the project configuration of developer tools
- You need to turn off the ES6 to ES5 feature, it may report an error if you turn it on.
- Need to turn off the style auto-completion when uploading code, it may report an error if you turn it on.
- You need to turn off the code compression upload, it may report an error if you turn it on.
KuaiShou Mini Program
Using the Taro plugin can support compiling kuaishou mini program, see Github for plugin documentation.
Version Requirements
Taro 3.3+
Please use version 1.0 or higher of taro-plugin-platform-kwai.
Taro 3.2
Please use version 1.2.x of taro-plugin-platform-ks.
Taro 3.0 - 3.1
Please use version 1.0.x of taro-plugin-platform-ks.
Installing plugins
yarn add @tarojs/plugin-platform-kwai
Configuring plugins
config = {
  // ...
  plugins: [
    '@tarojs/plugin-platform-kwai'
  ]
}
编译命令
# yarn
$ yarn dev:kwai
$ yarn build:kwai

# npm script
$ npm run dev:kwai
$ npm run build:kwai

# Global installation only
$ taro build --type kwai --watch
$ taro build --type kwai

$ npx taro build --type kwai --watch
$ npx taro build --type kwai

# watch also turn on compression
$ set NODE_ENV=production && taro build --type kwai --watch # Windows
$ NODE_ENV=production taro build --type kwai --watch # Mac
Developer Tools
Same as Alipay mini-program. The compile mode of developer tool is set to IOT mini-program.
H5
Compile Command
# yarn
$ yarn dev:h5
$ yarn build:h5

# npm script
$ npm run dev:h5
$ npm run build:h5

# global installation only
$ taro build --type h5 --watch
$ taro build --type h5

# npx users can also use
$ npx taro build --type h5 --watch
$ npx taro build --type h5
React Native
Taro v3.2+ support started
Please refer to React Native Development Process
Progressive Introduction Tutorial
We have provided a hands-on tutorial from the beginning to the end, please refer to《guide》。
Common Problems
Keep the version of the CLI consistent with the dependency version
When using Taro for multi-site development, keep the version of the Taro CLI consistent with the version of your project's dependencies, otherwise you may get compilation errors or runtime errors.
If you find inconsistencies you can use the Taro upgrade command taro update self [version] and taro update project [version]to upgrade the CLI and project dependencies to the specified version, respectively.
Alternatively, you can manually install the appropriate version of the CLI, modify the package.json dependency version number, and reinstall the dependency to resolve it.
# Use the Taro upgrade command to update the CLI version to the latest version
$ taro update self [version number]
# Use the Taro upgrade command to update the CLI version to the specified version
$ taro update self
# Use the Taro upgrade command to upgrade project dependencies to a version consistent with @tarojs/cli
$ taro update project
# Use the Taro upgrade command to upgrade project dependencies to the specified version
$ taro update project [version number]
If you are using Taro CLI version 3.0.9 and the dependency version used in your project is 3.0.10, you may have problems. In this case, please update your Taro CLI version to the same version as the project dependency version number, and if you still have problems, please Issue to the community.
Taro multi-version coexistence issue
Many developers have worked on projects with older versions of Taro and already have Taro installed globally, but want to experience Taro 3 at the same time, how should I proceed?
We offer two ideas:
- If you need to create a new Taro 3 project, you can use nvm to manage node versions and install different versions of the Taro CLI by installing different node versions, thus solving the problem of multiple versions of Taro coexisting.
- If some of the existing projects need to upgrade to Taro 3, you can install the corresponding version of Taro CLI locally in these projects, so that the locally installed Taro CLI will be used directly if you execute the command via
yarnornpm, byyarn add @tarojs/cli
Back to a certain version
To install a fixed version, or to go back to a certain version, e.g. if we want to install 1.3.9, we would do the following.
# Use npm install CLI
$ npm install -g @tarojs/cli@1.3.9
# OR use yarn npm CLI
$ yarn global add @tarojs/cli@1.3.9
# OR installed cnpm, use cnpm install CLI
$ cnpm install -g @tarojs/cli@1.3.9