React Native 端开发流程
本篇主要讲解 Taro React Native 端 环境安装-开发-调试-打包-发布 原理及流程,React Native 开发前注意事项请看 开发前注意
Taro3.x 跨端(h5、weapp、rn)开发可参考项目:Taro 跨平台demo(React Native + Weapp + h5)
Taro React Native APP 开发调试工具,请查看 Taro Playground 项目。
简介
Taro 移动端的开发基于 Facebook 的开源项目 React Native,Taro3.x 将不再锁定 React Native 版本,用户可在项目中自行安装 >=0.60 版本的 React Native。后续 React Native 我们将以最新版为主做兼容,及时跟进社区发展。
整体设计图如下:

其大致流程:
@taro/cli中通过registerPlatform注册rn平台;yarn dev:rn获得编译配置,转为babel.config.js及metro.config.js配置;- 所有
React Native不支持的语法及配置,通过编译配置支持; - 通过编译配置与
@tarojs/taro-rn-transformer生成React Native的入口文件index.ts; - 入口文件引入
@tarojs/taro-runtime-rn使用createReactNativeApp进行包装; - 页面文件引入
@tarojs/taro-runtime-rn使用createPageConfig进行包装; - 启动
metro bunlder; - 在
React Native Shell工程中运行react-native run-ios或react-native run-android加载index.bundle。
版本兼容情况
taro init 提供的初始化模板,会采用 React Native 的最新版本,建议 Taro 版本与 React Native 版本都保持最新。壳工程针对 0.63 以后的每个 React Native 版本都将提供对应分支,版本兼容情况如下:
| React Native 版本 | 兼容情况 | 壳工程分支 |
|---|---|---|
| < 0.60.0 | 不兼容,可考虑使用 Taro 1.x/2.x 版本 | - |
| 0.60.x | <= 3.4.2 兼容,但未全面测试,有问题请提供 issue | 0.63.2,更改 react-native 版本为 0.60.0 |
| 0.61.x | <= 3.4.2 兼容,但未全面测试,有问题请提供 issue | 0.63.2,更改 react-native 版本为 0.61.0 |
| 0.62.x | <= 3.4.2 兼容,但未全面测试,有问题请提供 issue | 0.63.2,更改 react-native 版本为 0.62.0 |
| 0.63.x | >= 3.2.0,但 3.2.13 版本以后,需手动添加配置,参考 PR | 0.63.2 |
| 0.64.x | >= 3.2.0 | 0.64.0 |
| 0.65.x | >= 3.3.10 | - |
| 0.66.x | >= 3.3.10 | 0.66.0 |
| 0.67.x | >= 3.3.10 | 0.67.0 |
通过模板进行初始化
使用 taro init 命令进行初始,选择 react-native 模板。完成后执行 yarn upgradePeerdeps 进行依赖初始化,模板相比于壳工程模式,将 js 工程与原生工程进行了合并,更加易于理解和使用。更多细节请查看 react-native 模板文档。
常用命令如下:
# 更新相关依赖。在初始化完成后或 Taro 版本更新后执行,用于同步 peerDependencies。
$ yarn upgradePeerdeps

# 打包 js bundle 及静态资源。在初始化完成后执行,用于打包默认使用的 bundle。
$ yarn build:rn --platform ios

# 启动 bundle server
$ yarn start

# 启动 iOS
$ yarn ios

# 启动安卓
$ yarn android
搭建 iOS 开发环境
必须安装的依赖有:Node、Watchman 和 React Native 命令行工具以及 Xcode。
虽然你可以使用任何编辑器来开发应用(编写 js 代码),但你仍然必须安装 Xcode 来获得编译 iOS 应用所需的工具和环境。
Node, Watchman
我们推荐使用 Homebrew 来安装 Node 和 Watchman。在命令行中执行下列命令安装:
brew install node
brew install watchman
如果你已经安装了 Node,请检查其版本是否在 v8.3 以上。安装完 Node 后建议设置 npm 镜像以加速后面的过程(或使用科学上网工具)。
注意:不要使用 cnpm!cnpm 安装的模块路径比较奇怪,packager 不能正常识别!
设置 npm 镜像:
npm config set registry https://registry.npm.taobao.org --global
npm config set disturl https://npm.taobao.org/dist --global
或者使用 nrm:
$ nrm ls

* npm -----  https://registry.npmjs.org/
  cnpm ----  https://r.cnpmjs.org/
  taobao --  https://registry.npm.taobao.org/
  nj ------  https://registry.nodejitsu.com/
  skimdb -- https://skimdb.npmjs.com/registry
$ nrm use cnpm  //switch registry to cnpm

    Registry has been set to: https://r.cnpmjs.org/
Watchman 则是由 Facebook 提供的监视文件系统变更的工具。安装此工具可以提高开发时的性能(packager 可以快速捕捉文件的变化从而实现实时刷新)。
Yarn
Yarn 是 Facebook 提供的替代 npm 的工具,可以加速 node 模块的下载。React Native 的命令行工具用于执行创建、初始化、更新项目、运行打包服务(packager)等任务。
npm install -g yarn
安装完 yarn 后同理也要设置镜像源:
yarn config set registry https://registry.npm.taobao.org --global
yarn config set disturl https://npm.taobao.org/dist --global
安装完 yarn 之后就可以用 yarn 代替 npm 了,例如用 yarn 代替 npm install 命令,用 yarn add 某第三方库名代替 npm install 某第三方库名。
CocoaPods
CocoaPods 是用 Ruby 编写的包管理器。从 0.60 版本开始 react native 的 iOS 版本需要使用 CocoaPods 来管理依赖。你可以使用下面的命令来安装 cocoapods。
sudo gem install cocoapods
或者使用 brew 来安装
brew install cocoapods
另外目前最新版本似乎不能在 ruby2.6 版本以下安装,意味着如果你使用的 macOS 版本低于 10.15 (Catalina) 则无法直接安装。可以尝试安装较旧一些的版本。如sudo gem install cocoapods -v 1.8.4,参考 issue 链接 https://github.com/CocoaPods/CocoaPods/issues/9568(https://github.com/CocoaPods/CocoaPods/issues/9568)
要了解更多信息,可以访问 CocoaPods 的官网。
Xcode
React Native 目前需要 Xcode 9.4 或更高版本。你可以通过 App Store 或是到 Apple 开发者官网 上下载。这一步骤会同时安装 Xcode IDE、Xcode 的命令行工具和 iOS 模拟器。
Xcode 的命令行工具
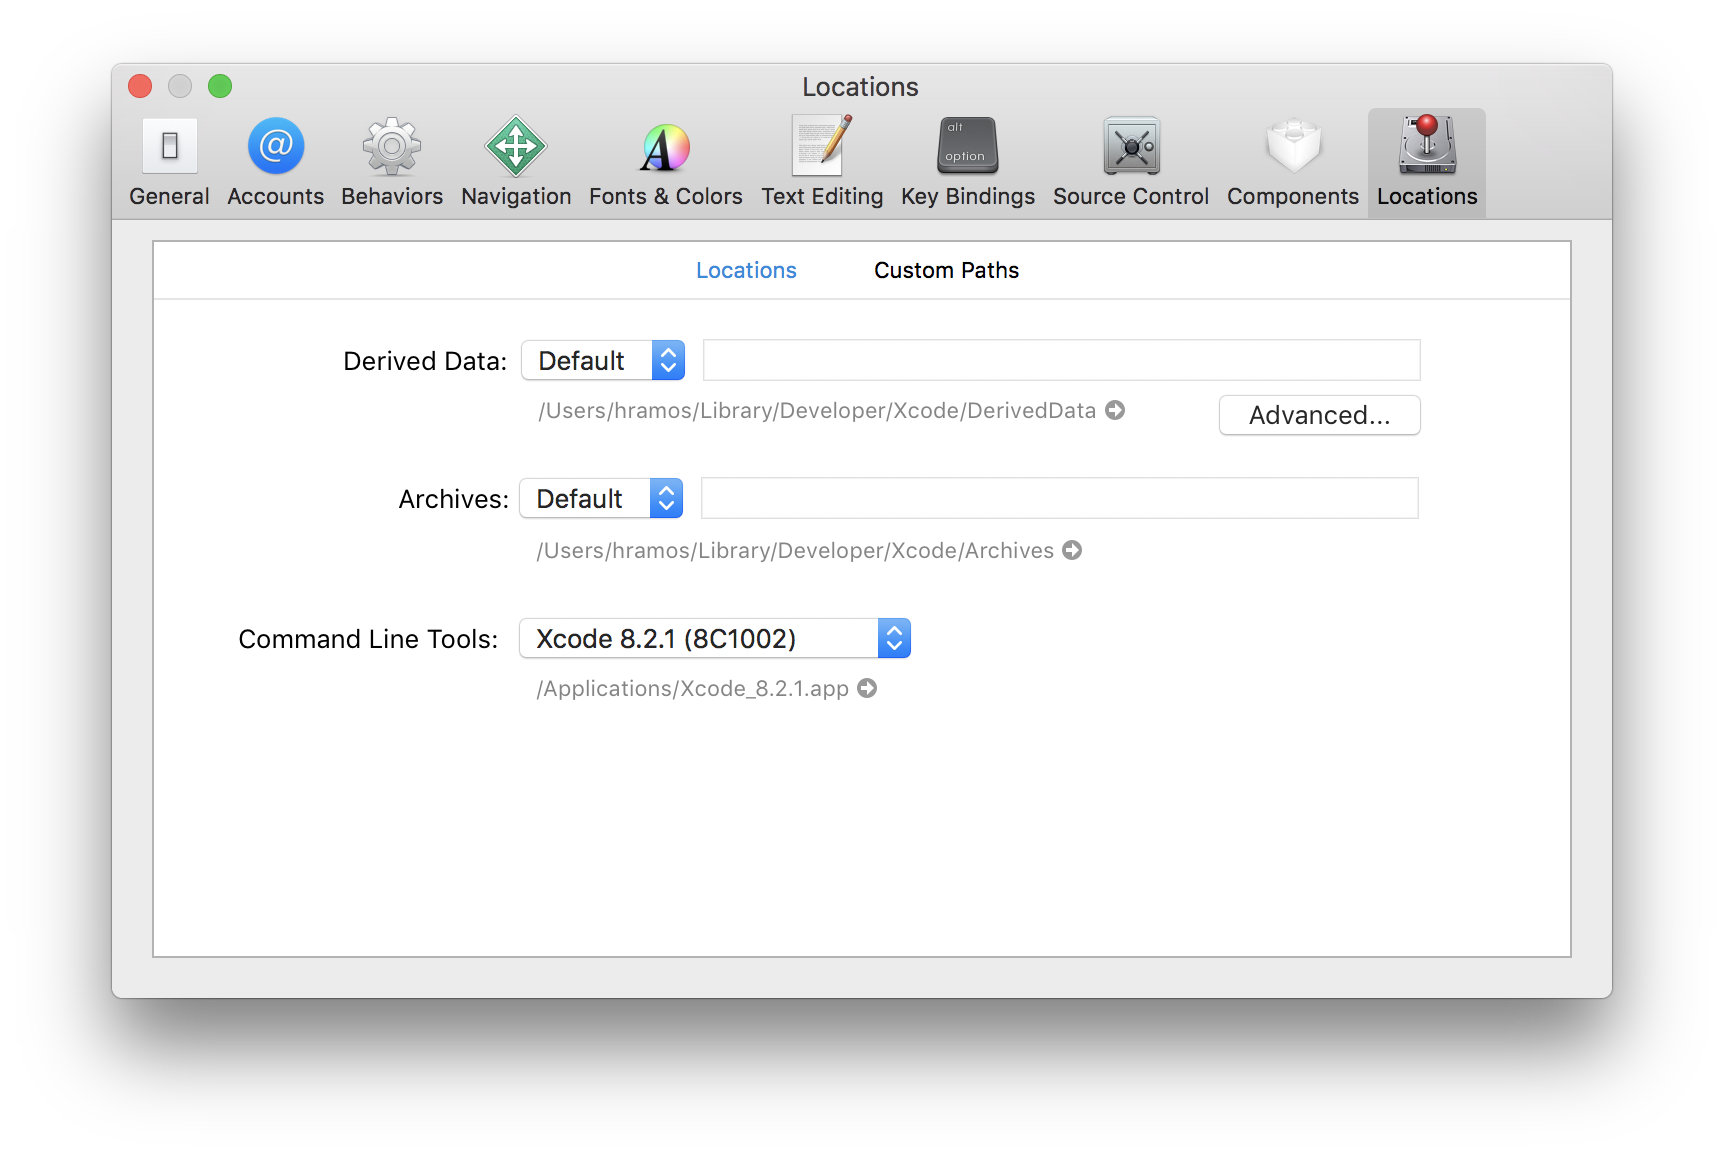
启动 Xcode,并在 Xcode | Preferences | Locations 菜单中检查一下是否装有某个版本的 Command Line Tools。Xcode 的命令行工具中包含一些必须的工具,比如 git 等。
搭建 Android 开发环境
安装依赖
必须安装的依赖有:Node、Watchman 和 React Native 命令行工具以及 JDK 和 Android Studio。
虽然你可以使用任何编辑器来开发应用(编写 js 代码),但你仍然必须安装 Android Studio 来获得编译 Android 应用所需的工具和环境。
Java Development Kit
React Native 需要 Java Development Kit [JDK] 1.8(暂不支持 1.9 及更高版本)。你可以在命令行中输入
javac -version来查看你当前安装的 JDK 版本。如果版本不合要求,则可以到 官网上下载。
Android 开发环境
如果你之前没有接触过 Android 的开发环境,那么请做好心理准备,这一过程相当繁琐。请 万分仔细地阅读下面的说明,严格对照文档进行配置操作。
注:请注意!!!国内用户必须必须必须有稳定的翻墙工具,否则在下载、安装、配置过程中会不断遭遇链接超时或断开,无法进行开发工作。某些翻墙工具可能只提供浏览器的代理功能,或只针对特定网站代理等等,请自行研究配置或更换其他软件。总之如果报错中出现有网址,那么 99% 就是无法正常翻墙。
如果是 socks5 代理 ,如下这样设置其实并没有什么卵用
#systemProp.socks.proxyHost=127.0.0.1
#systemProp.socks.proxyPort=8016

#systemProp.https.proxyHost=127.0.0.1
#systemProp.https.proxyPort=8016

#systemProp.https.proxyHost=socks5://127.0.0.1
#systemProp.https.proxyPort=8016
正确设置方法应该是这样: org.gradle.jvmargs=-DsocksProxyHost=127.0.0.1 -DsocksProxyPort=8016
修改 $HOME/.gradle/gradle.properties 文件,加入上面那句,这样就可以全局开启 gradle 代理
1. 安装 Android Studio
首先下载和安装 Android Studio,国内用户可能无法打开官方链接,请自行使用搜索引擎搜索可用的下载链接。安装界面中选择"Custom"选项,确保选中了以下几项:
- Android SDK
- Android SDK Platform
- Performance (Intel ® HAXM) (AMD 处理器看这里)
- Android Virtual Device
然后点击"Next"来安装选中的组件。
如果选择框是灰的,你也可以先跳过,稍后再来安装这些组件。
安装完成后,看到欢迎界面时,就可以进行下面的操作了。
2. 安装 Android SDK
Android Studio 默认会安装最新版本的 Android SDK。目前编译 React Native 应用需要的是 Android 6.0 (Marshmallow) 版本的 SDK(注意 SDK 版本不等于终端系统版本,RN 目前支持 android 4.1 以上设备)。你可以在 Android Studio 的 SDK Manager 中选择安装各版本的 SDK。
你可以在 Android Studio 的欢迎界面中找到 SDK Manager。点击 "Configure",然后就能看到 "SDK Manager"。
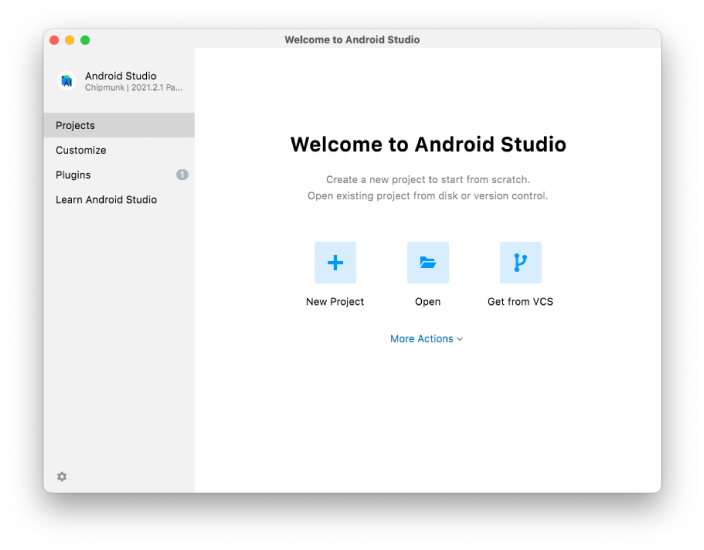
SDK Manager 还可以在 Android Studio 的 "Preferences" 菜单中找到。具体路径是
Appearance & Behavior → System Settings → Android SDK。
在 SDK Manager 中选择 "SDK Platforms"选项卡,然后在右下角勾选 "Show Package Details"。展开 Android 6.0 (Marshmallow) 选项,确保勾选了下面这些组件(重申你必须使用稳定的翻墙工具,否则可能都看不到这个界面):
Android SDK Platform 28Intel x86 Atom_64 System Image(官方模拟器镜像文件,使用非官方模拟器不需要安装此组件)
然后点击"SDK Tools"选项卡,同样勾中右下角的"Show Package Details"。展开"Android SDK Build-Tools"选项,确保选中了 React Native 所必须的 23.0.1 版本。你可以同时安装多个其他版本,然后还要勾选最底部的 Android Support Repository。
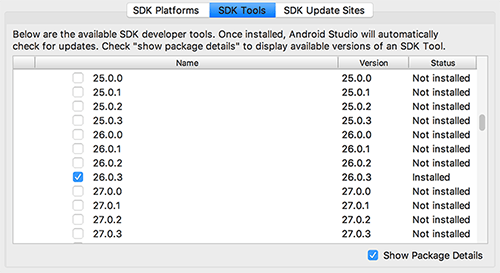
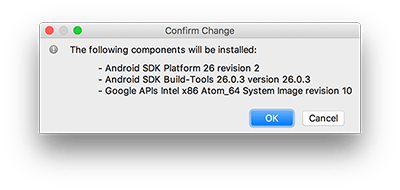
最后点击"Apply"来下载和安装这些组件。
3. 配置 ANDROID_HOME 环境变量
React Native 需要通过环境变量来了解你的 Android SDK 装在什么路径,从而正常进行编译。
具体的做法是把下面的命令加入到 ~/.bash_profile 文件中:
~表示用户目录,即/Users/你的用户名/,而小数点开头的文件在 Finder 中是隐藏的,并且这个文件有可能并不存在。可在终端下使用vi ~/.bash_profile命令创建或编辑。如不熟悉 vi 操作,请点击 这里 学习。
# 如果你不是通过Android Studio安装的sdk,则其路径可能不同,请自行确定清楚。
export ANDROID_HOME=$HOME/Library/Android/sdk
export PATH=$PATH:$ANDROID_HOME/tools
export PATH=$PATH:$ANDROID_HOME/platform-tools
如果你的命令行不是 bash,而是例如 zsh 等其他,请使用对应的配置文件。
使用 source $HOME/.bash_profile 命令来使环境变量设置立即生效(否则重启后才生效)。可以使用 echo $ANDROID_HOME 检查此变量是否已正确设置。
请确保你正常指定了 Android SDK 路径。你可以在 Android Studio 的 "Preferences" 菜单中查看 SDK 的真实路径,具体是
Appearance & Behavior → System Settings → Android SDK。
准备 Android 设备
你需要准备一台 Android 设备来运行 React Native Android 应用。这里所指的设备既可以是真机,也可以是模拟器。Android 官方提供了名为 Android Virtual Device(简称 AVD)的模拟器。此外还有很多第三方提供的模拟器如 Genymotion、BlueStack 等。一般来说官方模拟器免费、功能完整,但性能较差。第三方模拟器性能较好,但可能需要付费,或带有广告。
使用 Android 真机
你也可以使用 Android 真机来代替模拟器进行开发,只需用 usb 数据线连接到电脑,然后遵照 在设备上运行 这篇文档的说明操作即可。
使用 Android 模拟器
你可以在 Android Studi 打开 "AVD Manager" 来查看可用的虚拟设备,它的图标看起来像下面这样:

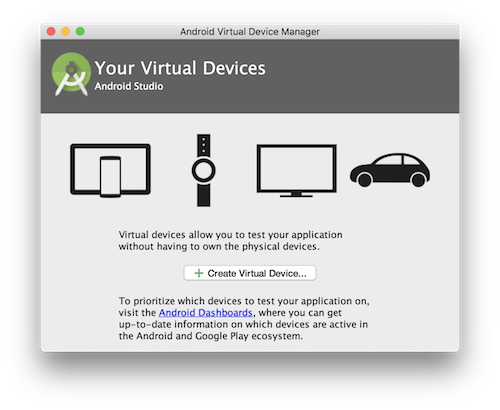
如果你刚刚才安装 Android Studio,那么可能需要先 创建一个虚拟设备。点击"Create Virtual Device...",然后选择所需的设备类型并点击"Next"。
选择 "x86 Images" 选项卡,这里可以看到你之前已安装过的镜像文件。必须先安装镜像文件才能创建对应的虚拟设备。
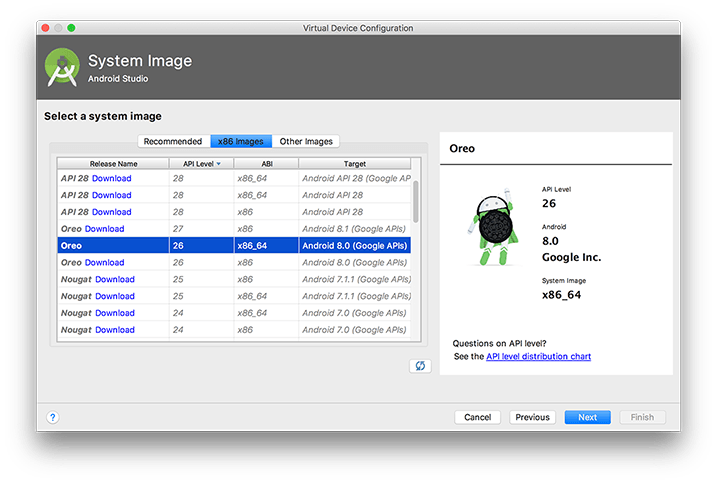
如果你还没有安装 HAXM(Intel 虚拟硬件加速驱动),则先按 这篇文档 说明来进行安装。

然后点击 "Next" 和 "Finish" 来完成虚拟设备的创建。
开发
编译
RN 编译预览模式:
# yarn
$ yarn dev:rn
# npm script
$ npm run dev:rn
# 仅限全局安装
$ taro build --type rn --watch
# npx 用户也可以使用
$ npx taro build --type rn --watch
Taro 将会开始编译文件:
$ taro build --type rn --watch
👽 Taro v3.0.15-alpha.11

Tips: 预览模式生成的文件较大,设置 NODE_ENV 为 production 可以开启压缩。
Example:
$ NODE_ENV=production taro build --type rn --watch


  ######                                         #     #
  #     #  ######    ##     ####   #####         ##    #    ##    #####  #  #    #  ######
  #     #  #        #  #   #    #    #           # #   #   #  #     #    #  #    #  #
  ######   #####   #    #  #         #    #####  #  #  #  #    #    #    #  #    #  #####
  #   #    #       ######  #         #           #   # #  ######    #    #  #    #  #
  #    #   #       #    #  #    #    #           #    ##  #    #    #    #   #  #   #
  #     #  ######  #    #   ####     #           #     #  #    #    #    #    ##    ######

warning: the transform cache was reset.
React-Native Dev server is running on port: 8080


To reload the app press "r"
To open developer menu press "d"
                 Welcome to React Native!
                Learn once, write anywhere
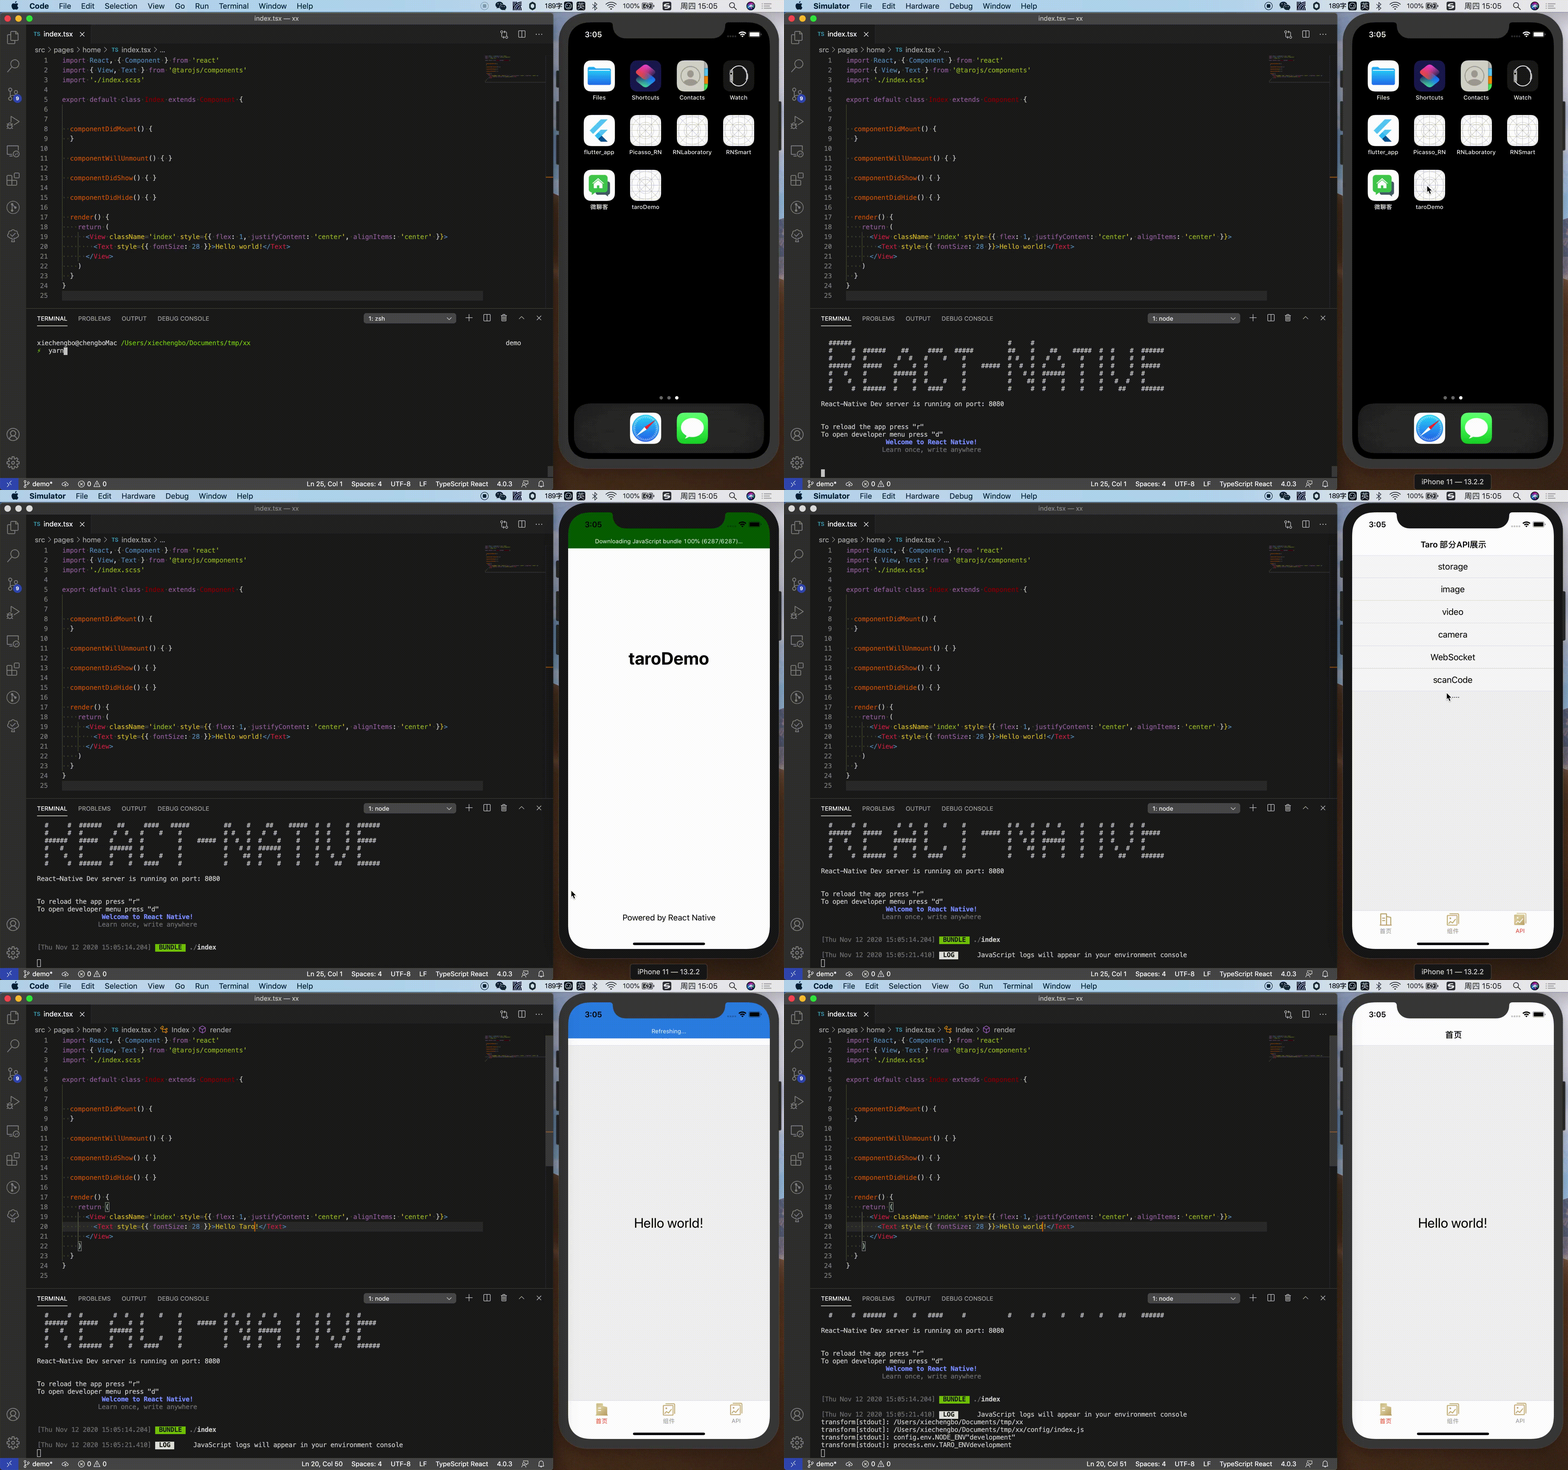
这时,在浏览器输入 http://127.0.0.1:8081/index.bundle?platform=ios&dev=true 会触发对应终端平台的 js bundle 构建。

构建完成后,浏览器会显示构建后的 js 代码。
Note:进入下一步之前请确保 Metro Bundler Server 正常启动,即浏览器能正常访问访问 jsbundle。
启动应用
如果上一步的编译和 Metro Bundler Server 启动没问题,接下来就可以启动应用了。
开发者可以自行整合 React Native (>=0.60) 到原生应用,同时为了方便大家开发和整合,Taro 将 React Native 工程中原生的部分剥离出来,单独放在一个工程里面 NervJS/taro-native-shell,你可以把它看成是 React Native iOS/Android 空应用的壳子。需要选择自己使用 React Native 版本对应的分支,当前默认为 0.64.0。
首先将应用代码 clone 下来:
git clone git@github.com:NervJS/taro-native-shell.git
然后 cd taro-native-shell,使用 yarn 或者 npm install 安装依赖。
工程目录如下:
➜  taro-native-shell git:(master) ✗ tree -L 1
.
├── LICENSE
├── README.md
├── android // Android 工程目录
├── ios // iOS 工程目录
├── node_modules
├── package.json
└── yarn.lock
iOS
使用 React Native 命令启动
$ cd ios & pod install
$ cd ..
$ react-native run-ios
注意:pod install 过程不可省略。
iOS 模拟器会自行启动,并访问 8081 端口获取 js bundle,这时 Metro Bundler 终端会打印以下内容:
BUNDLE [ios, dev] ./index.js ▓▓▓▓▓▓▓▓▓▓▓▓▓▓▓▓ 100.0% (1/1), done.
使用 Xcode 启动
iOS 的启动比较简单,使用 Xcode 打开 ios 目录,然后点击 Run 按钮就行。

这里需要注意的是 jsBundle 的 moduleName,默认的 moduleName 为 "taroDemo",需要和 config/index.js 里面配置 rn 的 appName 字段保持一致。
const config = {
  ...
  rn: {
    appName: 'taroDemo',
  }
  ...
}
该配置在 AppDelegate.m 文件中。
#import "AppDelegate.h"

#import <React/RCTBridge.h>
#import <React/RCTBundleURLProvider.h>
#import <React/RCTRootView.h>

#import <UMCore/UMModuleRegistry.h>
#import <UMReactNativeAdapter/UMNativeModulesProxy.h>
#import <UMReactNativeAdapter/UMModuleRegistryAdapter.h>

#ifdef FB_SONARKIT_ENABLED
#import <FlipperKit/FlipperClient.h>
#import <FlipperKitLayoutPlugin/FlipperKitLayoutPlugin.h>
#import <FlipperKitUserDefaultsPlugin/FKUserDefaultsPlugin.h>
#import <FlipperKitNetworkPlugin/FlipperKitNetworkPlugin.h>
#import <SKIOSNetworkPlugin/SKIOSNetworkAdapter.h>
#import <FlipperKitReactPlugin/FlipperKitReactPlugin.h>

static void InitializeFlipper(UIApplication *application) {
  FlipperClient *client = [FlipperClient sharedClient];
  SKDescriptorMapper *layoutDescriptorMapper = [[SKDescriptorMapper alloc] initWithDefaults];
  [client addPlugin:[[FlipperKitLayoutPlugin alloc] initWithRootNode:application withDescriptorMapper:layoutDescriptorMapper]];
  [client addPlugin:[[FKUserDefaultsPlugin alloc] initWithSuiteName:nil]];
  [client addPlugin:[FlipperKitReactPlugin new]];
  [client addPlugin:[[FlipperKitNetworkPlugin alloc] initWithNetworkAdapter:[SKIOSNetworkAdapter new]]];
  [client start];
}
#endif

@interface AppDelegate () <RCTBridgeDelegate>

@property (nonatomic, strong) UMModuleRegistryAdapter *moduleRegistryAdapter;

@end

@implementation AppDelegate

- (BOOL)application:(UIApplication *)application didFinishLaunchingWithOptions:(NSDictionary *)launchOptions
{
#ifdef FB_SONARKIT_ENABLED
  InitializeFlipper(application);
#endif

  self.moduleRegistryAdapter = [[UMModuleRegistryAdapter alloc] initWithModuleRegistryProvider:[[UMModuleRegistryProvider alloc] init]];

  RCTBridge *bridge = [[RCTBridge alloc] initWithDelegate:self launchOptions:launchOptions];
  RCTRootView *rootView = [[RCTRootView alloc] initWithBridge:bridge
                                                   moduleName:@"taroDemo"
                                            initialProperties:nil];

  rootView.backgroundColor = [[UIColor alloc] initWithRed:1.0f green:1.0f blue:1.0f alpha:1];

  self.window = [[UIWindow alloc] initWithFrame:[UIScreen mainScreen].bounds];
  UIViewController *rootViewController = [UIViewController new];
  rootViewController.view = rootView;
  self.window.rootViewController = rootViewController;
  [self.window makeKeyAndVisible];
  [super application:application didFinishLaunchingWithOptions:launchOptions];
  return YES;
}

- (NSArray<id<RCTBridgeModule>> *)extraModulesForBridge:(RCTBridge *)bridge
{
    NSArray<id<RCTBridgeModule>> *extraModules = [_moduleRegistryAdapter extraModulesForBridge:bridge];
    // If you'd like to export some custom RCTBridgeModules that are not Expo modules, add them here!
    return extraModules;
}

- (NSURL *)sourceURLForBridge:(RCTBridge *)bridge
{
#if DEBUG
  return [[RCTBundleURLProvider sharedSettings] jsBundleURLForBundleRoot:@"index" fallbackResource:nil];
#else
  return [[NSBundle mainBundle] URLForResource:@"main" withExtension:@"jsbundle"];
#endif
}

@end
更多资料,可以查看 Xcode 文档:Building Your App
Android
在 taro-native-shell/android 目录下,你就可以看到 React Native 的工程代码。
使用 React Native 命令启动
$ react-native run-android
Android 模拟器会自行启动,并访问 8081 端口获取 js bundle,这时 Metro Bundler 终端会打印一下内容:
BUNDLE [android, dev] ./index.js ▓▓▓▓▓▓▓▓▓▓▓▓▓▓▓▓ 100.0% (1/1), done.
在真实设备上运行
按照以下步骤设置您的设备:
使用一根 USB 电缆将您的设备连接到您的开发机器。如果您是在 Windows 上开发,可能需要为您的设备 安装相应的 USB 驱动程序。
按照以下步骤操作,在 Developer options 中启用 USB debugging。 首先,您必须启用开发者选项:
1. 打开 Settings 应用。
2. (仅在 Android 8.0 或更高版本上)选择 System。
3. 滚动到底部,然后选择 About phone。
4. 滚动到底部,点按 Build number 7 次。
5. 返回上一屏幕,在底部附近可找到 Developer options。打开 Developer options,然后向下滚动以找到并启用 USB debugging。
按照以下步骤操作,在您的设备上运行应用:
- 在 Android Studio 中,点击 Project 窗口中的 app 模块,然后选择 Run > Run(或点击工具栏中的 Run )。
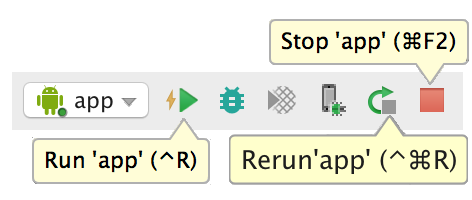
- 在 Select Deployment Target 窗口中,选择您的设备,然后点击 OK。

Android Studio 会在您连接的设备上安装并启动应用。
在模拟器上运行
按照以下步骤操作,在模拟器上运行应用:
- 在 Android Studio 中,点击 Project 窗口中的 app 模块,然后选择 Run > Run(或点击工具栏中的 Run )。
- 在 Select Deployment Target 窗口中,点击 Create New Virtual Device。

- 在 Select Hardware 屏幕中,选择电话设备(如 Pixel),然后点击 Next。
- 在 System Image 屏幕中,选择具有最高 API 级别的版本。如果您未安装该版本,将显示一个 Download 链接,因此,请点击该链接并完成下载。
- 点击 Next。
- 在 Android Virtual Device (AVD) 屏幕上,保留所有设置不变,然后点击 Finish。
- 返回到 Select Deployment Target 对话框中,选择您刚刚创建的设备,然后点击 OK。
Android Studio 会在模拟器上安装并启动应用。
Module Name
同样,Android 这边默认的 jsBundle moduleName 也是 “taroDemo”,位于 MainActivity.java 的文件里面:
package com.tarodemo;

import com.facebook.react.ReactActivity;

public class MainActivity extends ReactActivity {

    /**
     * Returns the name of the main component registered from JavaScript.
     * This is used to schedule rendering of the component.
     */
    @Override
    protected String getMainComponentName() {
        return "taroDemo";
    }
}
你可以根据实际情况自行修改。
调试
更多资料可以查看 React Native 调试。
开发者菜单
React Native 在 iOS 模拟器上支持一些快捷键操作,具体会在下文中描述。要使用快捷键请务必确保模拟器的 Hardware 菜单中,Keyboard 选项下的"Connect Hardware Keyboard"处于开启状态,否则按键是没有响应的。
你可以通过摇晃设备或是选择 iOS 模拟器的 "Hardware" 菜单中的 "Shake Gesture" 选项来打开开发菜单。另外,如果是在 iOS 模拟器中运行,还可以按下 Command⌘ + D 快捷键,Android 模拟器对应的则是 Command⌘ + M(windows 上可能是 F1 或者 F2),或是直接在命令行中运行 adb shell input keyevent 82 来发送菜单键命令。
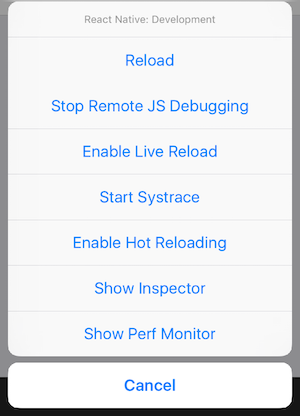
在发布(production)版本中开发者菜单将无法使用。
刷新 JavaScript
传统的原生应用开发中,每一次修改都需要重新编译,但在 RN 中你只需要刷新一下 JavaScript 代码,就能立刻看到变化。具体的操作就是在开发菜单中点击 "Reload" 选项。也可以在 iOS 模拟器中按下 Command⌘ + R ,Android 模拟器上对应的则是 按两下R。
自动刷新
选择开发菜单中的 "Enable Live Reload" 可以开启自动刷新,这样可以节省你开发中的时间。
更神奇的是,你还可以保持应用的当前运行状态,修改后的 JavaScript 文件会自动注入进来(就好比行驶中的汽车不用停下就能更换新的轮胎)。要实现这一特性只需开启开发菜单中的 Hot Reloading 选项。
某些情况下 hot reload 并不能顺利实施。如果碰到任何界面刷新上的问题,请尝试手动完全刷新。
但有些时候你必须要重新编译应用才能使修改生效:
- 增加了新的资源(比如给 iOS 的Images.xcassets或是 Andorid 的res/drawable文件夹添加了图片)
- 更改了任何的原生代码(objective-c/swift/java)
应用内的错误与警告提示(红屏和黄屏)
红屏或黄屏提示都只会在开发版本中显示,正式的离线包中是不会显示的。
红屏错误
应用内的报错会以全屏红色显示在应用中(调试模式下),我们称为红屏(red box)报错。你可以使用console.error()来手动触发红屏错误。
黄屏警告
应用内的警告会以全屏黄色显示在应用中(调试模式下),我们称为黄屏(yellow box)报错。点击警告可以查看详情或是忽略掉。和红屏报警类似,你可以使用 console.warn() 来手动触发黄屏警告。在默认情况下,开发模式中启用了黄屏警告。可以通过以下代码关闭:
console.disableYellowBox = true;
console.warn('YellowBox is disabled.');
你也可以通过代码屏蔽指定的警告,像下面这样调用 ignoreWarnings 方法,参数为一个数组:
import {YellowBox} from 'react-native';
YellowBox.ignoreWarnings(['Warning: ...']);
在 CI/Xcode 中,黄屏警告还可以通过设置 IS_TESTING 环境变量来控制启用与否。
红屏错误和黄屏警告在发布版(release/production)中都是自动禁用的。
Chrome 开发者工具
在开发者菜单中选择 "Debug JS Remotely" 选项,即可以开始在 Chrome 中调试 JavaScript 代码。点击这个选项的同时会自动打开调试页面 http://localhost:8081/debugger-ui.(如果地址栏打开的是 ip 地址,则请自行改为 localhost)
在 Chrome 的菜单中选择 Tools → Developer Tools 可以打开开发者工具,也可以通过键盘快捷键来打开(Mac 上是 Command⌘ + Option⌥ + I,Windows 上是 Ctrl + Shift + I或是 F12)。打开有 异常时暂停(Pause On Caught Exceptions) 选项,能够获得更好的开发体验。
注意:Chrome 中并不能直接看到 App 的用户界面,而只能提供 console 的输出,以及在 sources 项中断点调试 js 脚本。一些老的教程和文章会提到 React 的 Chrome 插件,这一插件目前并不支持 React Native,而且调试本身并不需要这个插件。不过你可以安装独立(非插件)版本的 React Developer Tools 来辅助查看界面布局,下文会讲述具体安装方法。
注意:使用 Chrome 调试目前无法观测到 React Native 中的网络请求,你可以使用功能更强大的第三方的 react-native-debugger来进行观测。
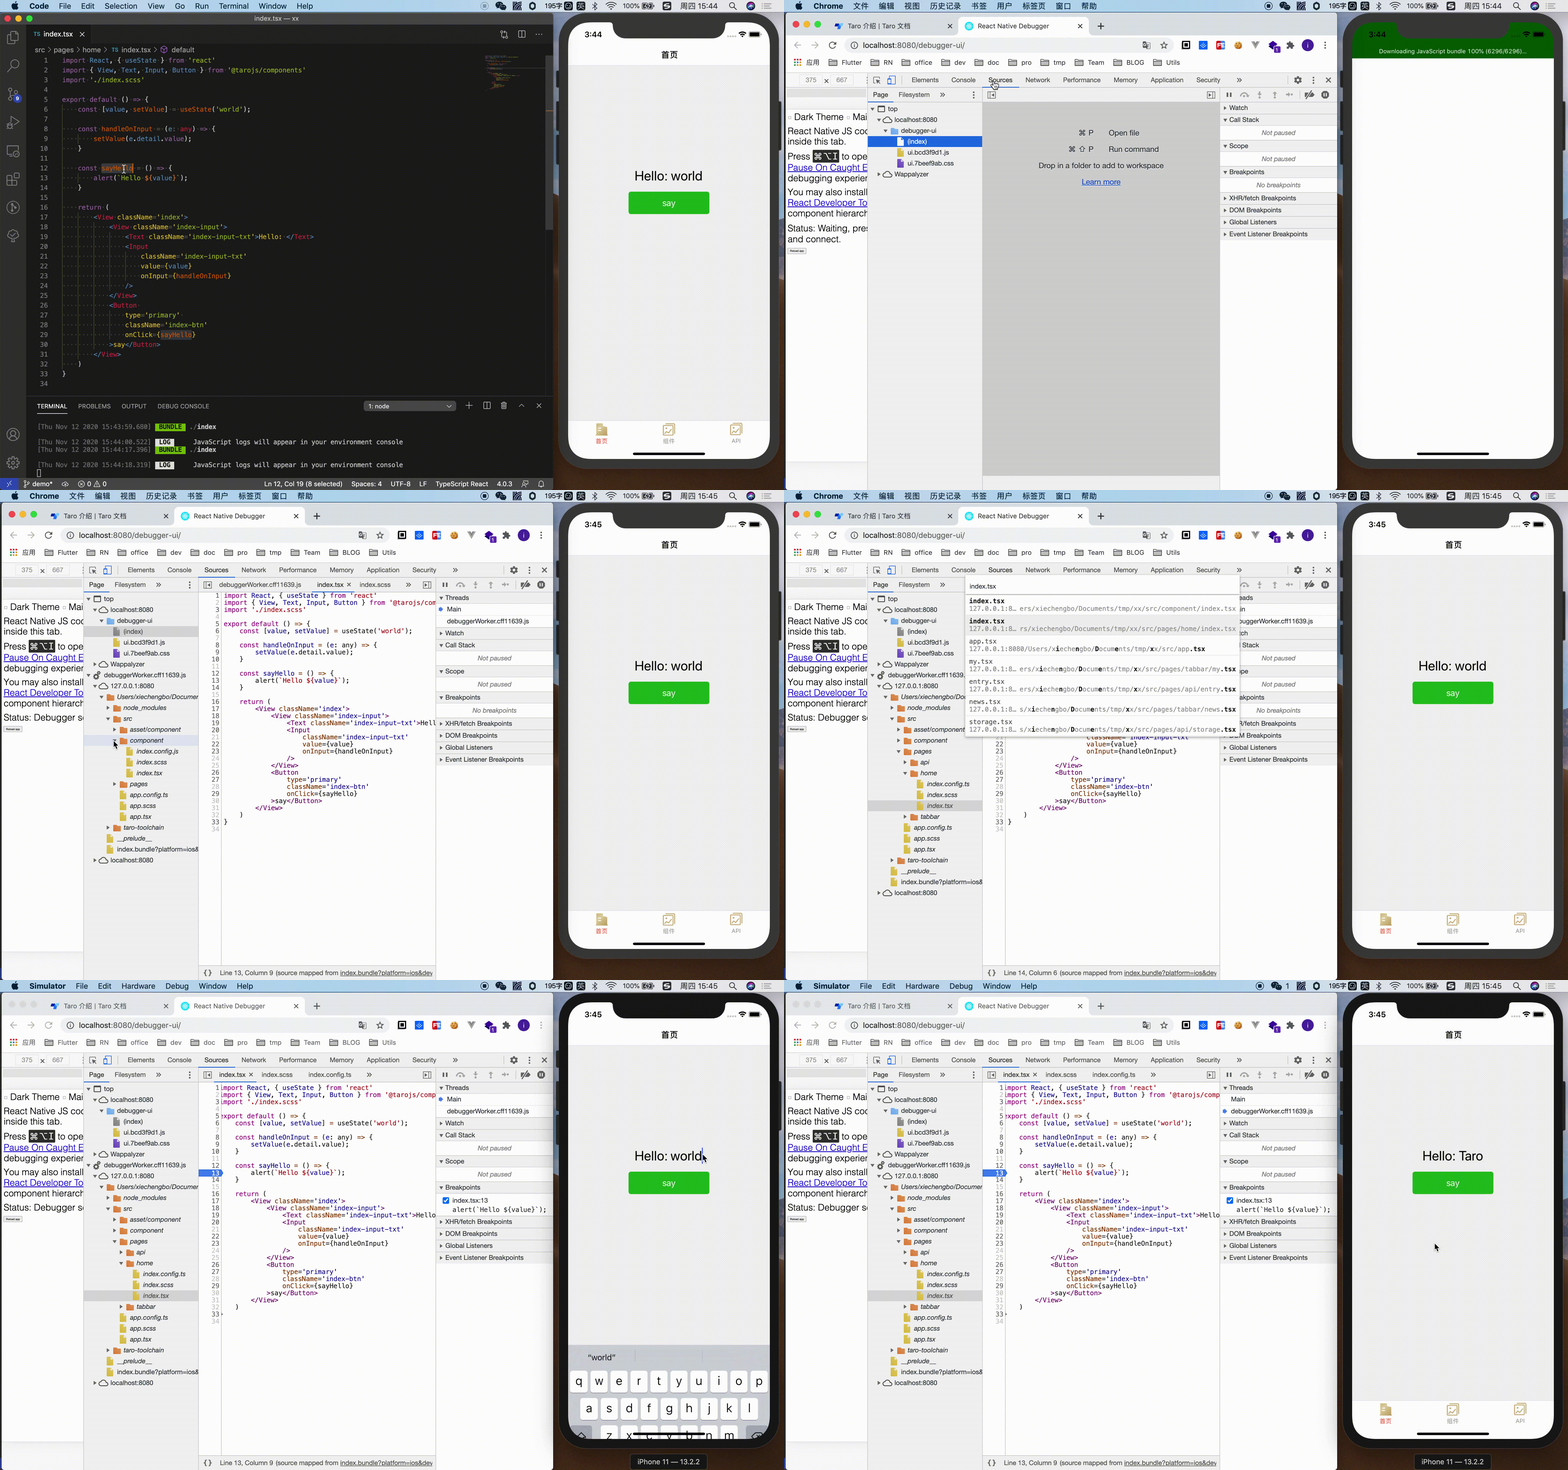
Chrome source-map 调试
Taro3.x 实现了 React-Native 的 source-map 支持。
使用自定义的 JavaScript 调试器来调试
如果想用其他的 JavaScript 调试器来代替 Chrome,可以设置一个名为 REACT_DEBUGGER 的环境变量,其值为启动自定义调试器的命令。调试的流程依然是从开发者菜单中的 "Debug JS Remotely" 选项开始。
被指定的调试器需要知道项目所在的目录(可以一次传递多个目录参数,以空格隔开)。例如,如果你设定了 REACT_DEBUGGER="node /某个路径/launchDebugger.js --port 2345 --type ReactNative",那么启动调试器的命令就应该是 node /某个路径/launchDebugger.js --port 2345 --type ReactNative /某个路径/你的RN项目目录。
以这种方式执行的调试器最好是一个短进程(short-lived processes),同时最好也不要有超过 200k 的文字输出。
使用 Chrome 开发者工具来在设备上调试
If you're using Create React Native App, this is configured for you already.
对于 iOS 真机来说,需要打开 RCTWebSocketExecutor.m 文件,然后将其中的 "localhost" 改为你的电脑的 IP 地址,最后启用开发者菜单中的 "Debug JS Remotely" 选项。
对于 Android 5.0+设备(包括模拟器)来说,将设备通过 USB 连接到电脑上后,可以使用adb命令行工具来设定从设备到电脑的端口转发:
adb reverse tcp:8081 tcp:8081
如果设备 Android 版本在 5.0 以下,则可以在开发者菜单中选择"Dev Settings - Debug server host for device",然后在其中填入电脑的”IP 地址:端口“。
如果在 Chrome 调试时遇到一些问题,那有可能是某些 Chrome 的插件引起的。试着禁用所有的插件,然后逐个启用,以确定是否某个插件影响到了调试。
使用 React Developer Tools 调试
You can use the standalone version of React Developer Tools to debug the React component hierarchy. To use it, install the react-devtools package globally:
npm install -g react-devtools
译注:react-devtools 依赖于 electron,而 electron 需要到国外服务器下载二进制包,所以国内用户这一步很可能会卡住。此时请在环境变量中添加 electron 专用的国内镜像源:ELECTRON_MIRROR="https://npm.taobao.org/mirrors/electron/",然后再尝试安装 react-devtools。
安装完成后在命令行中执行 react-devtools 即可启动此工具:
react-devtools
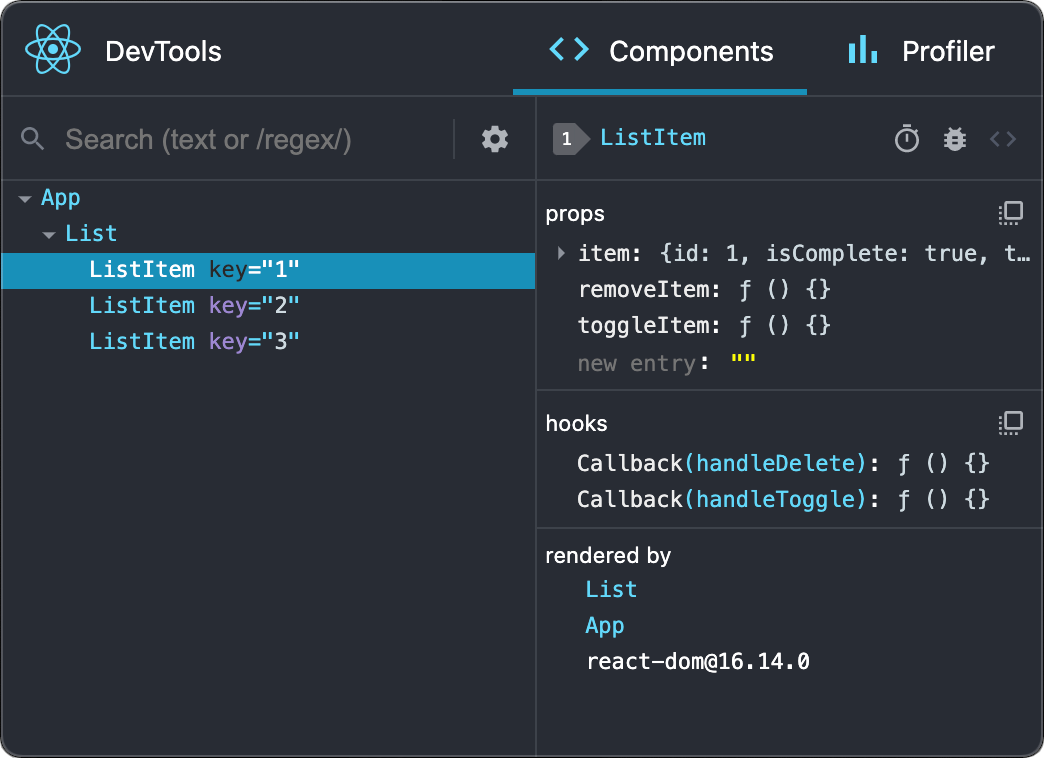
It should connect to your simulator within a few seconds.
Note: if you prefer to avoid global installations, you can add react-devtools as a project dependency. Add the react-devtools package to your project using npm install --save-dev react-devtools, then add "react-devtools": "react-devtools" to the scripts section in your package.json, and then run npm run react-devtools from your project folder to open the DevTools.
Integration with React Native Inspector
Open the in-app developer menu and choose "Show Inspector". It will bring up an overlay that lets you tap on any UI element and see information about it:
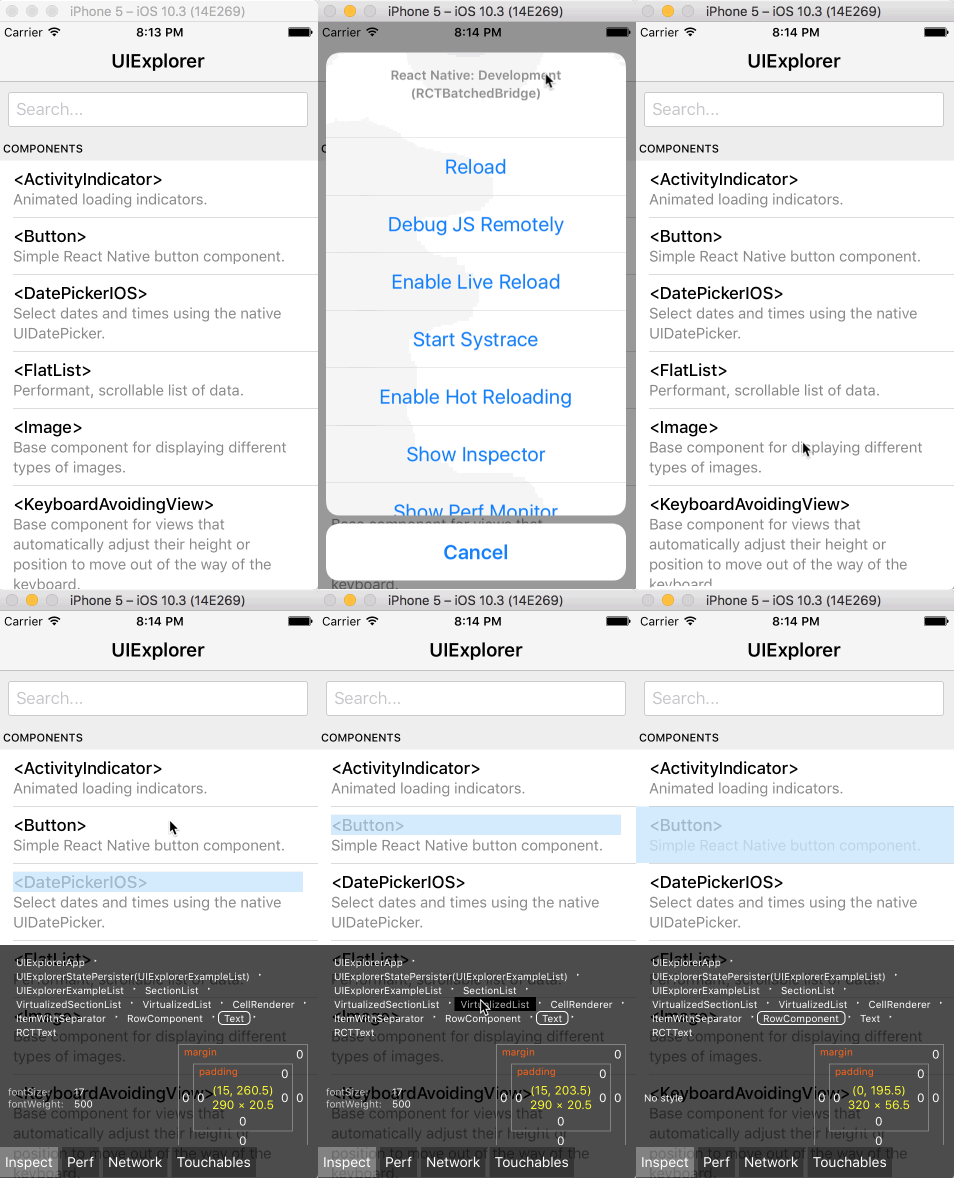
However, when react-devtools is running, Inspector will enter a special collapsed mode, and instead use the DevTools as primary UI. In this mode, clicking on something in the simulator will bring up the relevant components in the DevTools:
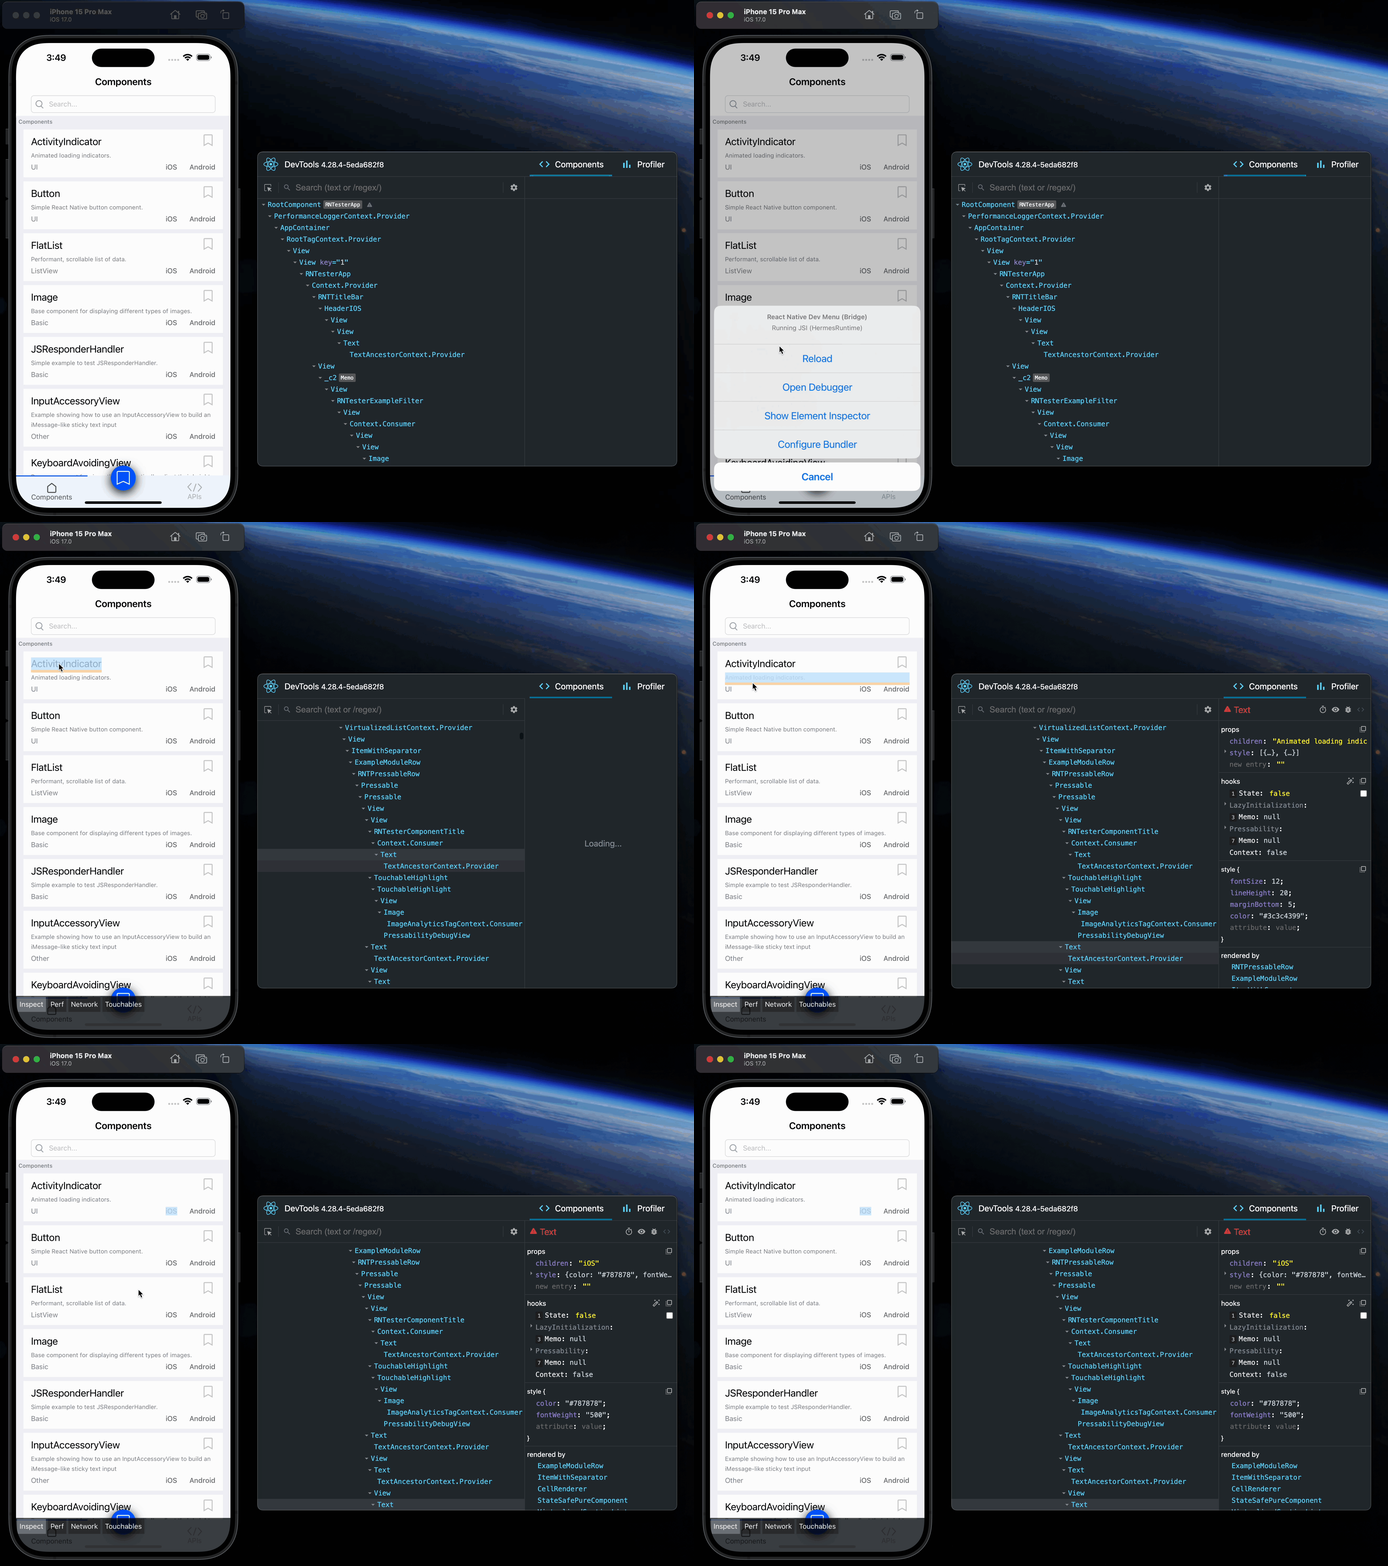
You can choose "Hide Inspector" in the same menu to exit this mode.
Inspecting Component Instances
When debugging JavaScript in Chrome, you can inspect the props and state of the React components in the browser console.
First, follow the instructions for debugging in Chrome to open the Chrome console.
Make sure that the dropdown in the top left corner of the Chrome console says debuggerWorker.js. This step is essential.
Then select a React component in React DevTools. There is a search box at the top that helps you find one by name. As soon as you select it, it will be available as $r in the Chrome console, letting you inspect its props, state, and instance properties.
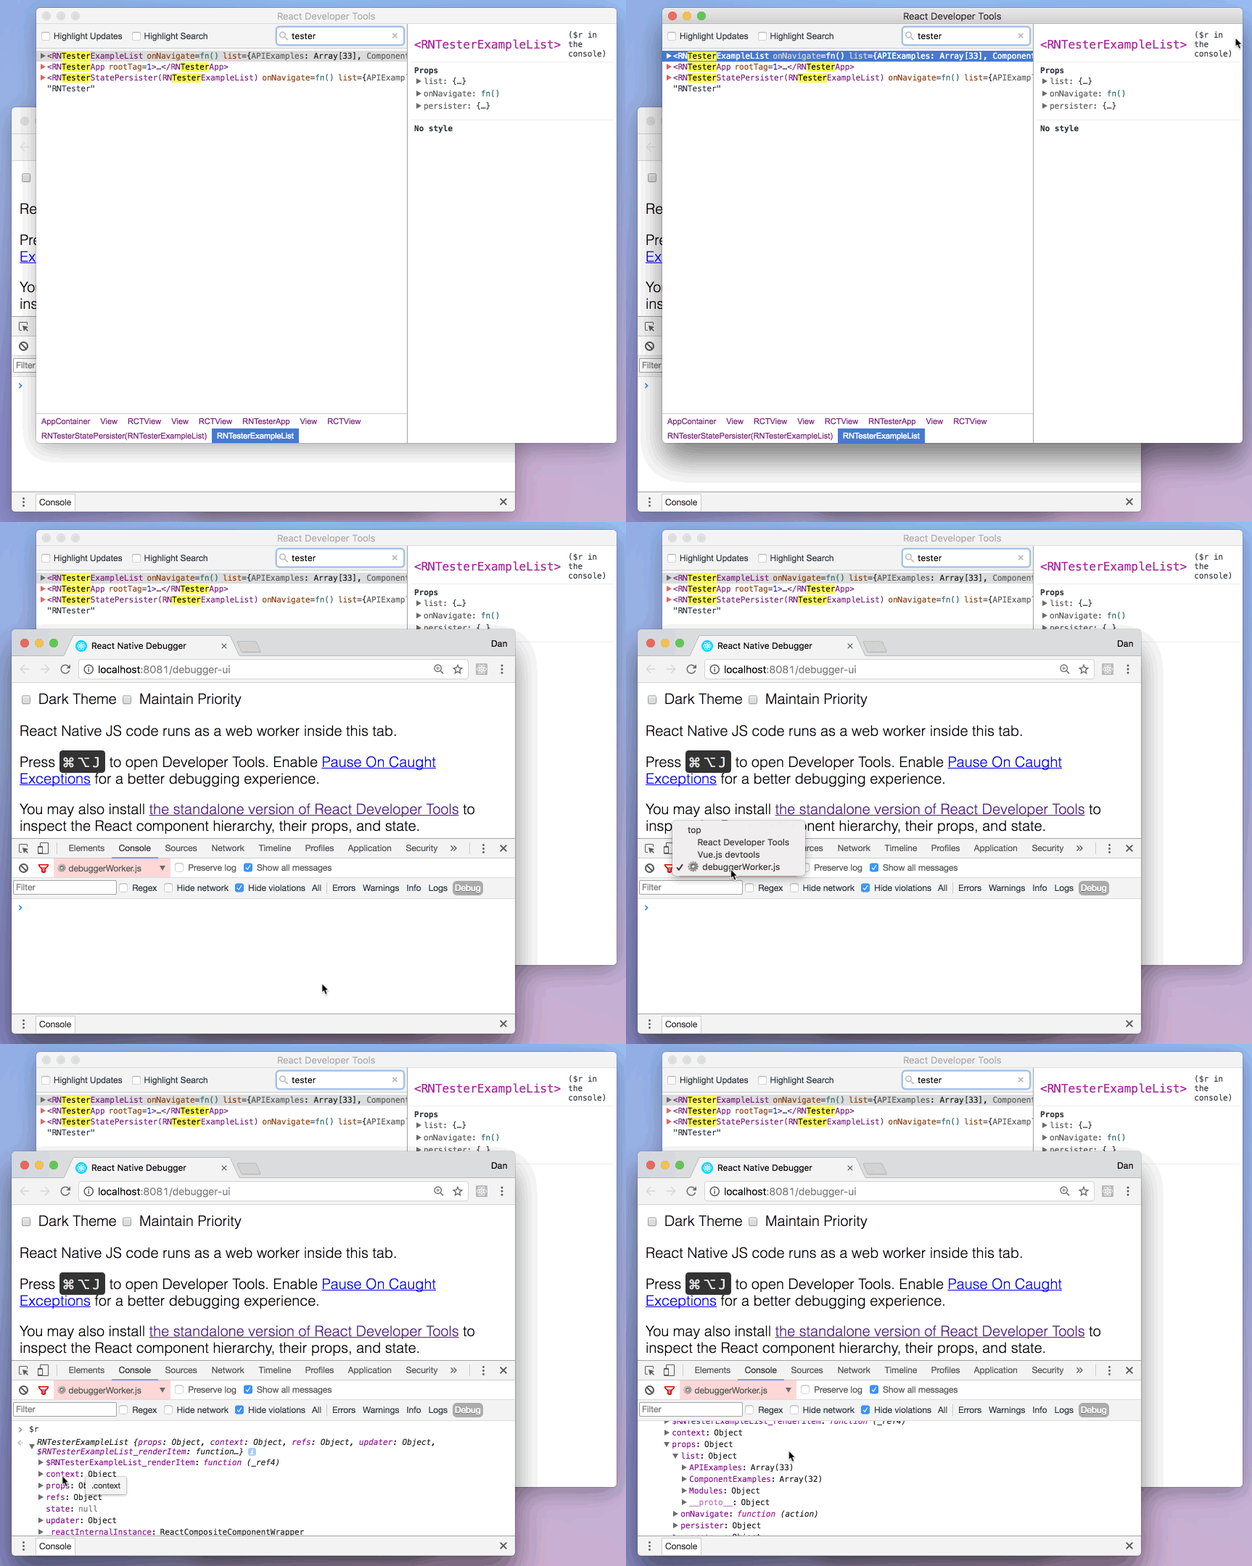
使用 React Native Debugger 调试
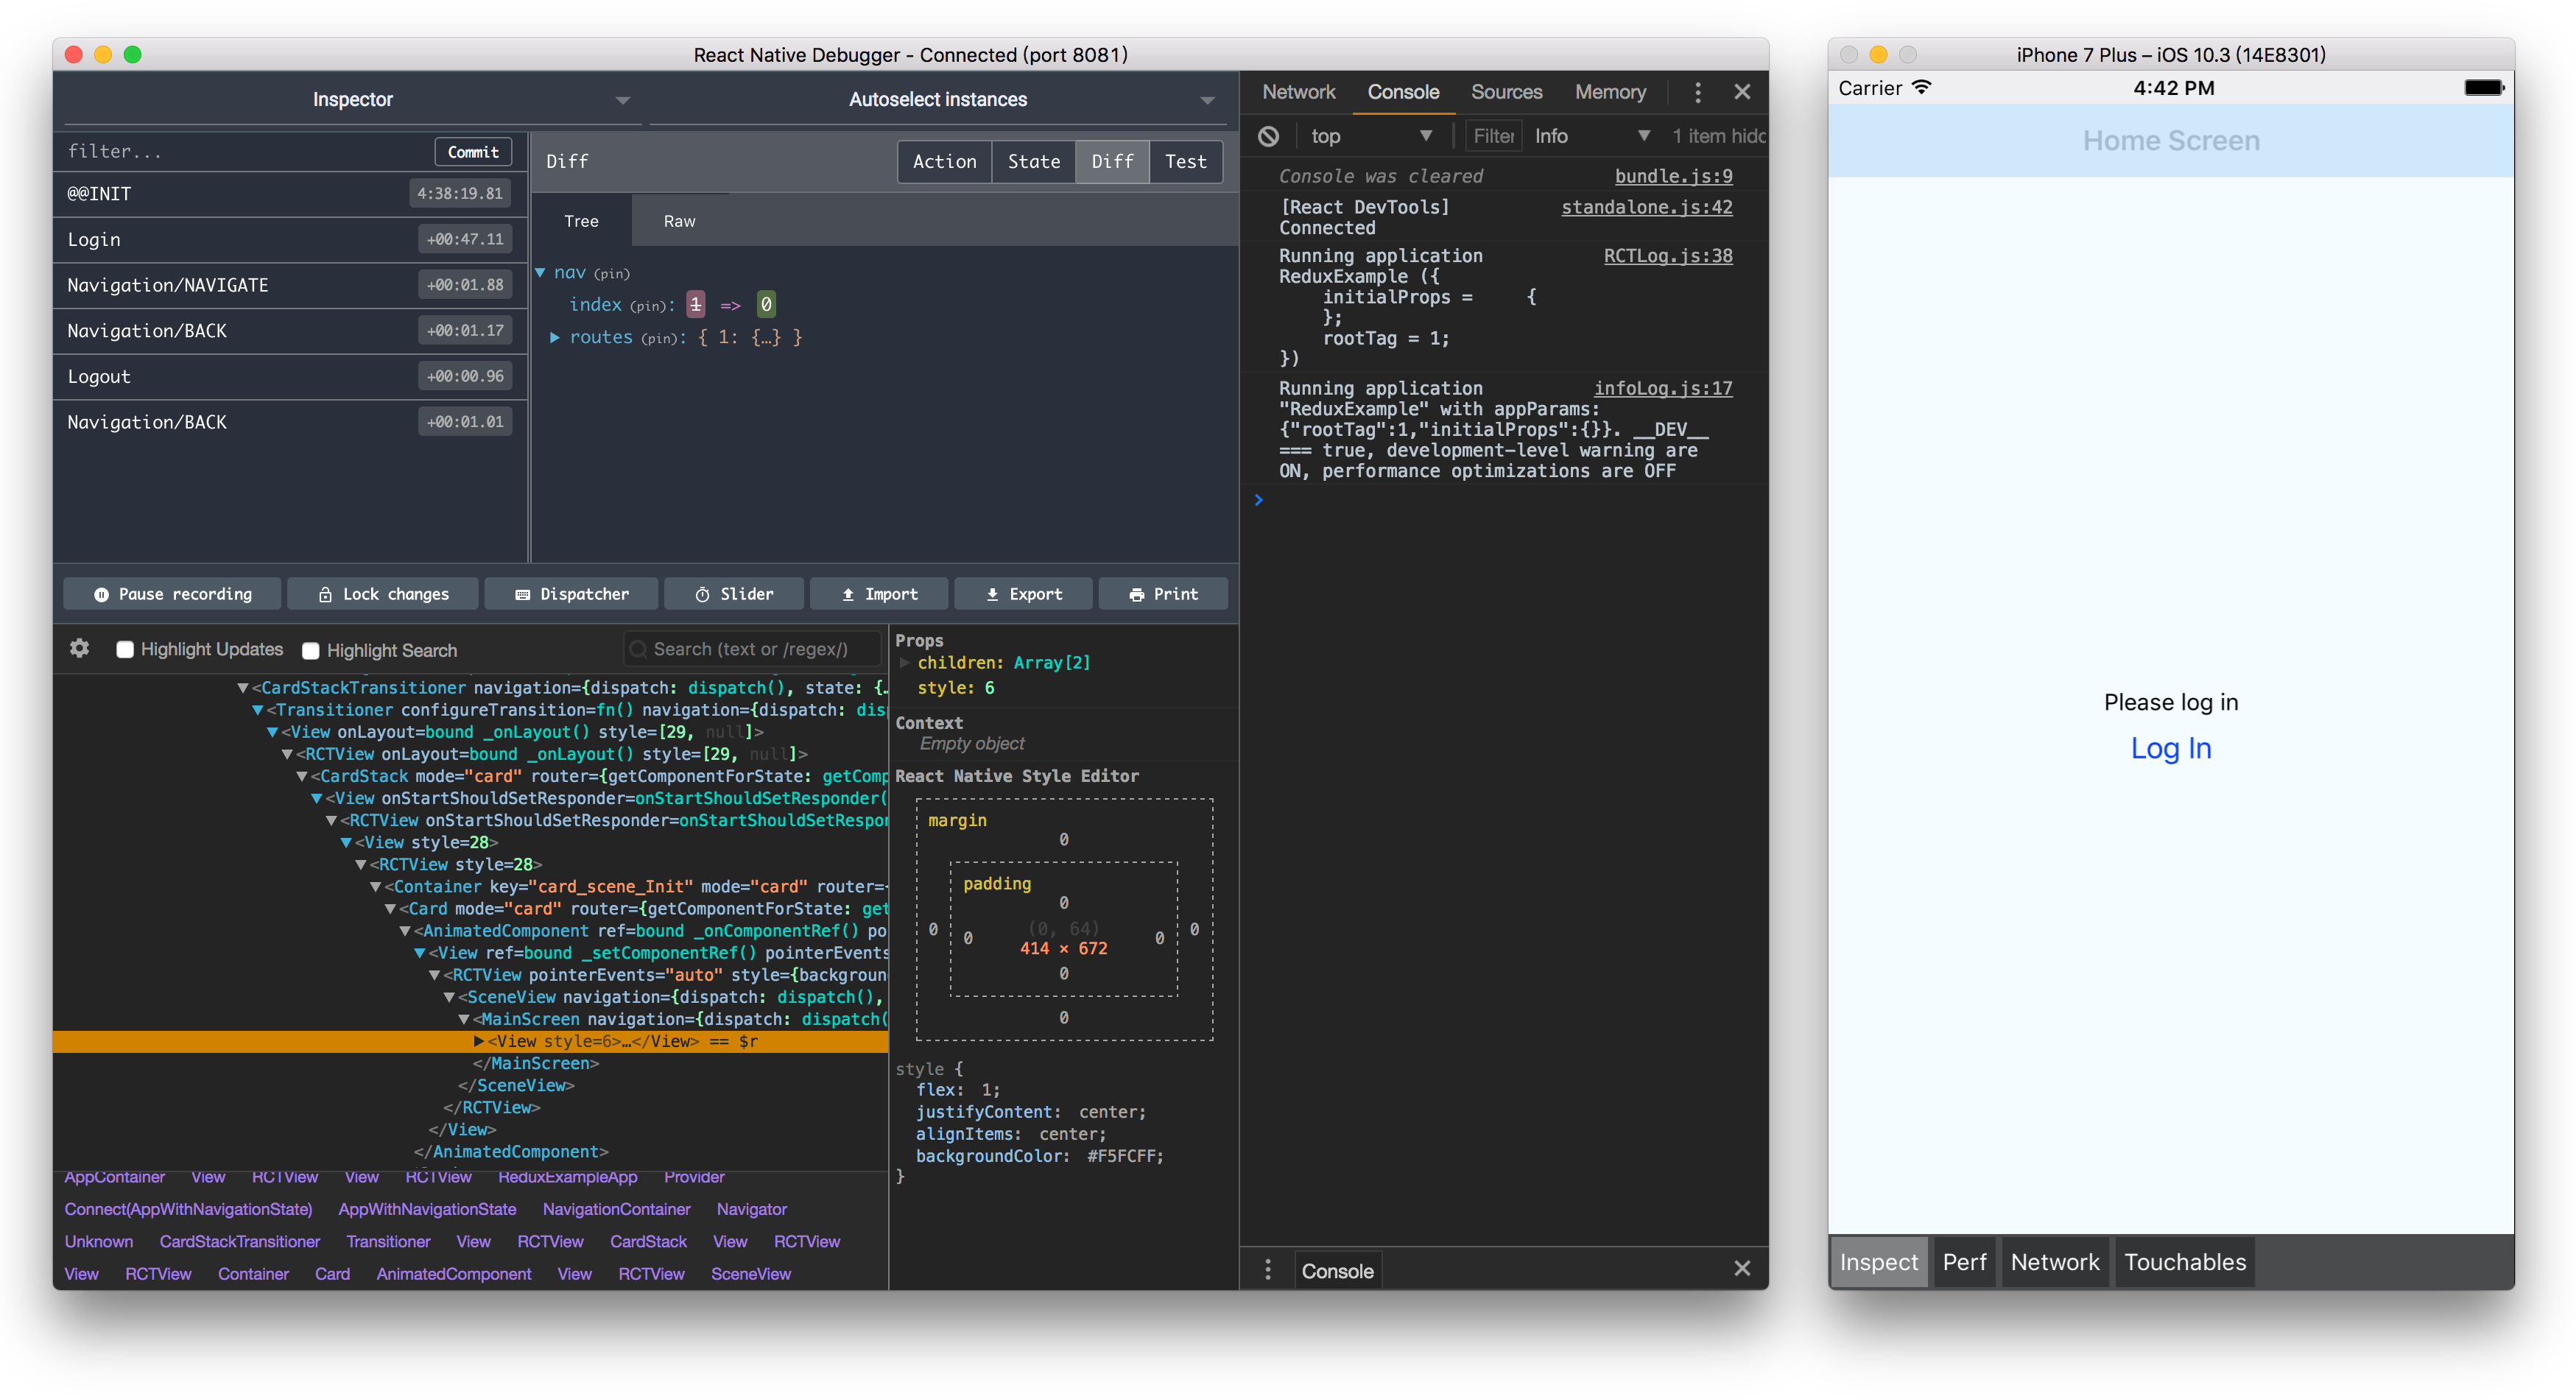
React Native Debugger ,一个基于 React Native 官方调试方式、包含 React Inspector / Redux DevTools 独立应用:
- 基于官方的 Remote Debugger 且提供了更为丰富的功能
- 包含
react-devtools-core的 React Inspector - 包含 Redux DevTools,且与
redux-devtools-extension保持 API 一致
安装
不同平台及版本的安装包,请点击这里。
macOS 平台可以使用 Homebrew Cask 安装:
$ brew update && brew cask install react-native-debugger
启动
在启动 React Native Debugger 之前,请先确认以下内容:
- 所有的 React Native 的 debugger 客户端已关闭,特别是
http://localhost:<port>/debugger-ui - React Native Debugger 会尝试连接 debugger 代理, React Native 默认使用
8081端口, 你可以新建一个 debugger 窗口 (macOS:Command + T,Linux/Windows:Ctrl + T) 开定义端口 - 保证 developer menu 的
Debug JS Remotely处于开启状态
你可以启动应用之后再修改端口,也可以直接通过命令行启动应用时指定端口:
$ open "rndebugger://set-debugger-loc?host=localhost&port=8081"
如果启动之后调试窗口空白,请确认调试端口正确。
使用 Redux DevTools Extension API
Use the same API as redux-devtools-extension is very simple:
const store = createStore(
  reducer, /* preloadedState, */
  window.__REDUX_DEVTOOLS_EXTENSION__ && window.__REDUX_DEVTOOLS_EXTENSION__()
)
See Redux DevTools Integration section for more information.
更多资料
- 快速开始
- Debugger 整合
- React DevTools 整合
- Redux DevTools 整合
- Shortcut references
- Network inspect of Chrome Developer Tools
- Enable open in editor in console
- Troubleshooting
- Contributing
使用原生模块
有一些平台性的差异是 Taro 无法抹平的,比如支付、登录等,这时候就需要自己写跨端代码,RN 端这边可能还需要修改原生代码。
例如登录的功能:

React Native 参考文档:原生模块
集成到现有原生 app
Taro 编译后的项目实际上就是一个 native React Native 项目,所以集成到现有原生 app 的流程和 React Native 也是一样的。
如果你正准备从头开始制作一个新的应用,那么 React Native 会是个非常好的选择。但如果你只想给现有的原生应用中添加一两个视图或是业务流程,React Native 也同样不在话下。只需简单几步,你就可以给原有应用加上新的基于 React Native 的特性、画面和视图等。
React Native 参考文档:集成到现有原生应用
构建独立 app
接下来的步骤将会帮助你为 iOS 和 Android 创建 Expo 应用程序的独立二进制文件,并将其提交到 Apple App Store 和 Google Play Store。
构建 iOS 独立应用程序需要 Apple Developer 帐户,但构建 Android 独立应用程序不需要 Google Play Developer 帐户。如果您想要提交到任一应用商店,您将需要该商店的开发者帐户。
在打包时,我们会将 Taro 代码编译成相应平台的 jsbundle 文件:
taro build --type rn --platform ios
taro build --type rn --platform android
然后 .dist 目录(如果你没有修改)下会生成转换后的 index.bundels.js 代码。
配置 output
通过修改配置 ./config/index.js 指定资源输出目录,如
{
  rn: {
    output: {
      iosSourceMapUrl: '', // sourcemap 文件url
      iosSourcemapOutput: '../taro-native-shell/ios/main.map', // sourcemap 文件输出路径
      iosSourcemapSourcesRoot: '', // 将 sourcemap 资源路径转为相对路径时的根目录
      androidSourceMapUrl: '',
      androidSourcemapOutput: '../taro-native-shell/android/app/src/main/assets/index.android.map',
      androidSourcemapSourcesRoot: '',
      ios: '../taro-native-shell/ios/main.jsbundle',
      iosAssetsDest: '../taro-native-shell/ios',
      android: '../taro-native-shell/android/app/src/main/assets/index.android.bundle',
      androidAssetsDest: '../taro-native-shell/android/app/src/main/res'
    },
  }
}
Taro 会读取 output 字段的内容且自动覆盖默认配置。
设置 xcode 相关参数
设置 xcode 参数,以使 APP 直接加载 build 后的 bundle 文件。
添加 bundle 文件及静态资源文件


设置脚本执行条件

选择打包 release/debug 包。(product -> scheme -> edit scheme)

此时再次运行
taro-native-shell则可根据scheme配置加载相应的包。
iOS
参考文档:在设备上运行
Android
参考文档:打包APK
发布
打包好的应用发布到 App Store 或各大应用商店可以查看官方文档。
常见错误
No bundle url present
导致这个报错的原因很多,最常见的是电脑开了代理。具体可以参考 #12754
UnableToResolveError: Unable to resolve module AccessibilityInfo
原因很多,我这边是重启电脑就好了😂。 具体可以查看 #14209
Metro Bundler error: Expected path […] to be relative to one of the project roots
不支持 npm link,可以使用 nicojs/node-install-local 替代。
Image component does not resolve images with filenames that include '@' symbol
React Native 不支持路径中带 @ 符号,具体可以查看 #14980。
The development server returned response error code 500
 多半是依赖的问题,删除 npm 依赖,再重新安装就可以了。
也可以试一下以下命令:
watchman watch-del-all
rm -rf node_modules && npm install
rm -fr $TMPDIR/react-*
具体可以参考 #1282
app 加载阻塞: "Building JavaScript bundle... 100%"

可能的原因很多,可以参考这个 issue:react-community/create-react-native-app#392